User Management
General Information
In the database application, you can manage all data. You can create and manage projects and their associated components, such as drawings. The same applies to article, customer, and supplier data, as well as „assembly parts to panels“ relationships.
Additionally, you can manage settings for users, permission groups, workstations, and the system here.
When records are opened for editing, the following navigation bar is available at the top of the editing dialog.
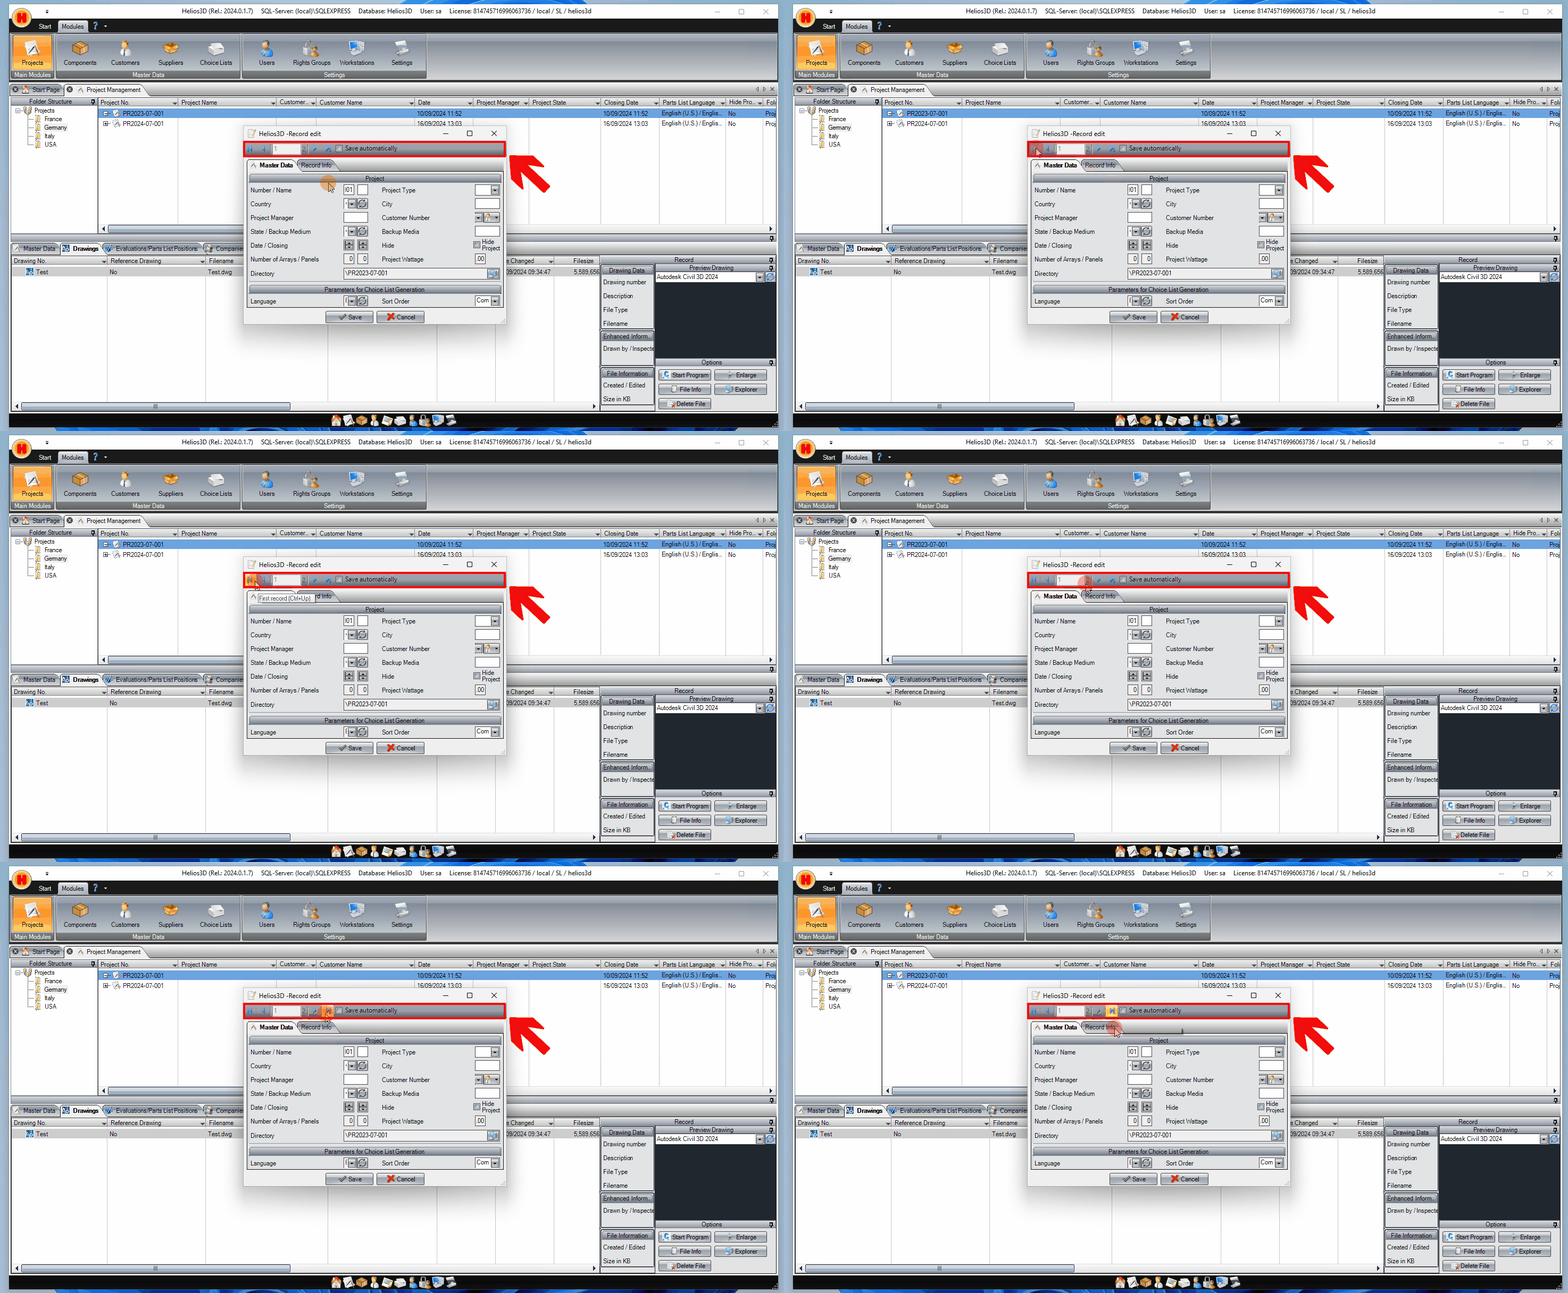
With this, you can navigate to the first, previous, next, or last record in the respective list. After making changes to the current record, you will be prompted to save the changes when switching to another record. By enabling the „auto-save“ option, you can bypass this prompt.
Folder Structure
For most modules, you can create and manage a folder structure. This can be done through the context menu of the respective structure tree, as shown below for project management.
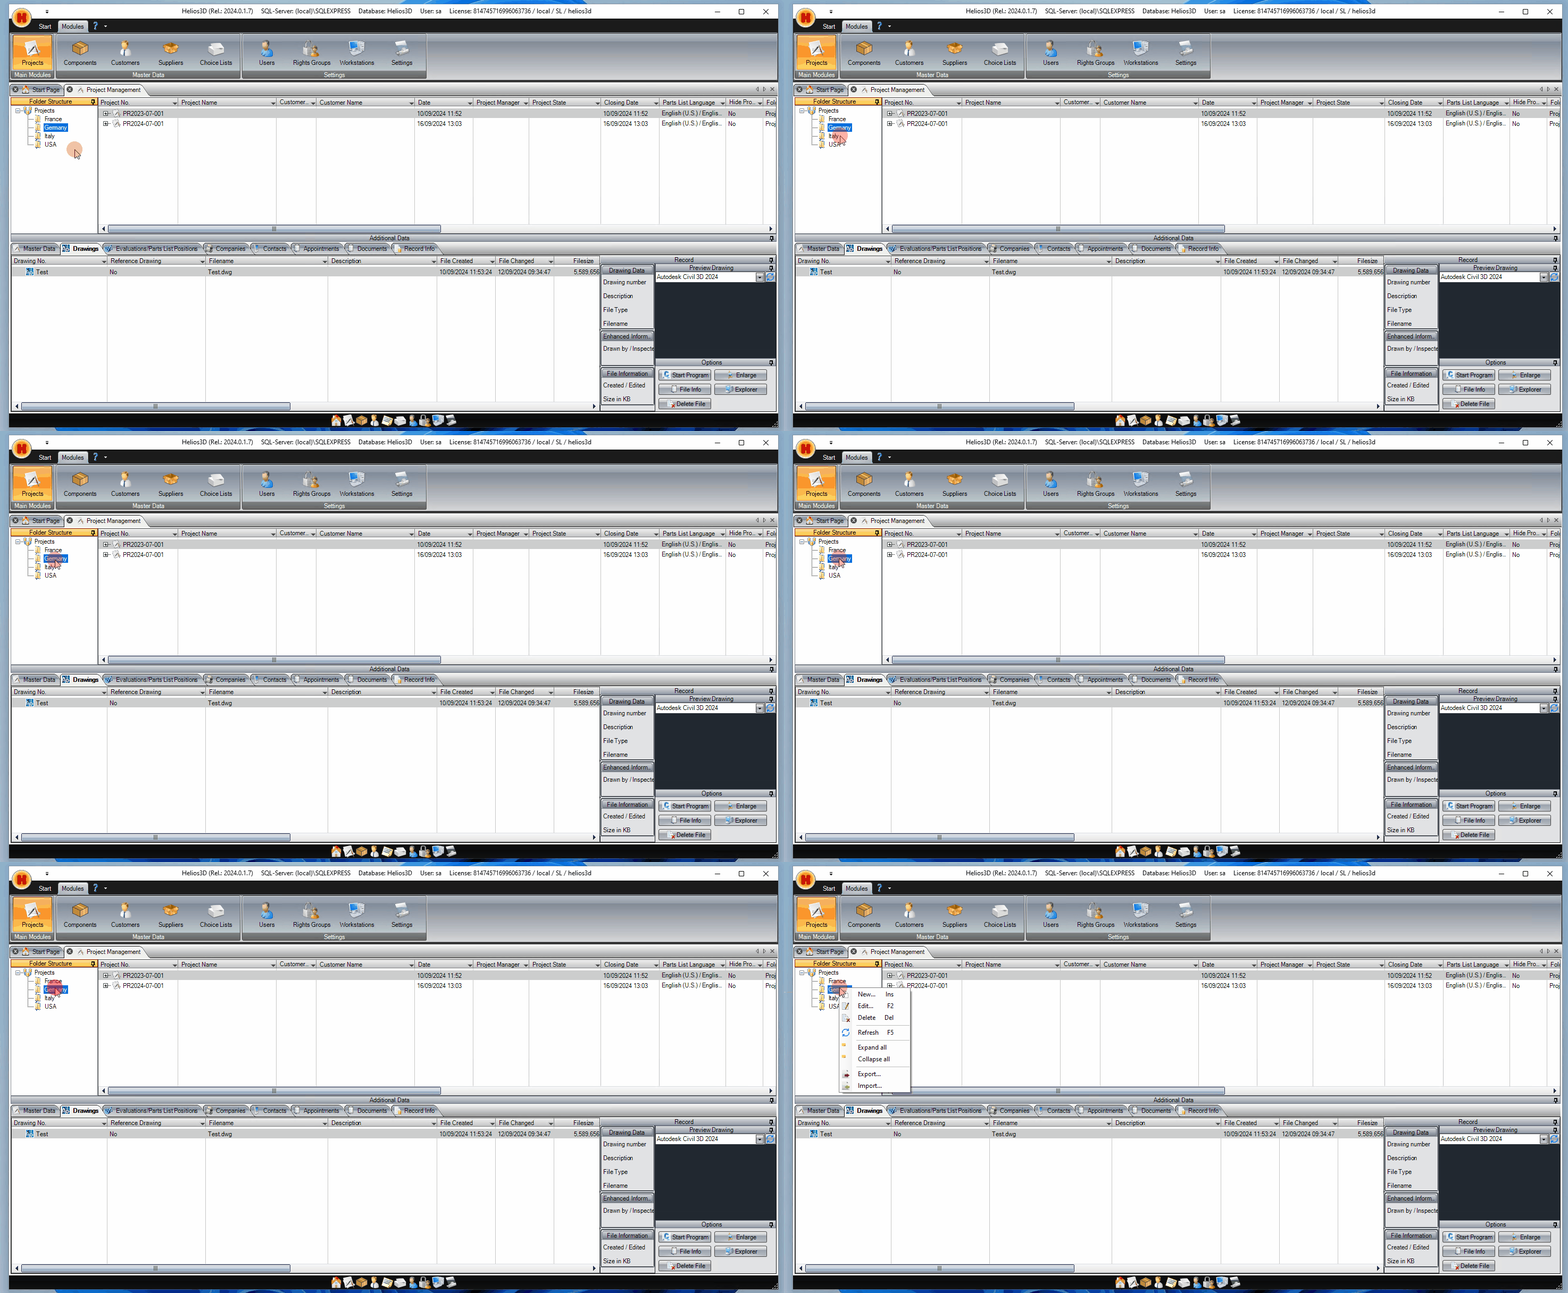
New
Creates a new folder.
Edit…
Opens a dialog where you can change the name. In this dialog, you can also right-click to create or modify a translation of the name for the English, Spanish, or French version of Helios 3D.
Delete
Deletes selected folders along with all items contained within them.
Update
Updates the tree structure.
Expand All
Expands all branches of the structure tree below the current node.
Collapse All
Collapses all branches of the structure tree below the current node.
Export
Exports selected records.
Import
Currently non-functional.
User Management
Here, new users can be created for the database or existing user profiles can be edited.
| Please note that changes in user management can affect a user’s working environment and functionality, and should therefore be carried out with great caution! |
Editing a user
When editing an existing user profile, the following dialog will be displayed, where you can make all necessary adjustments.
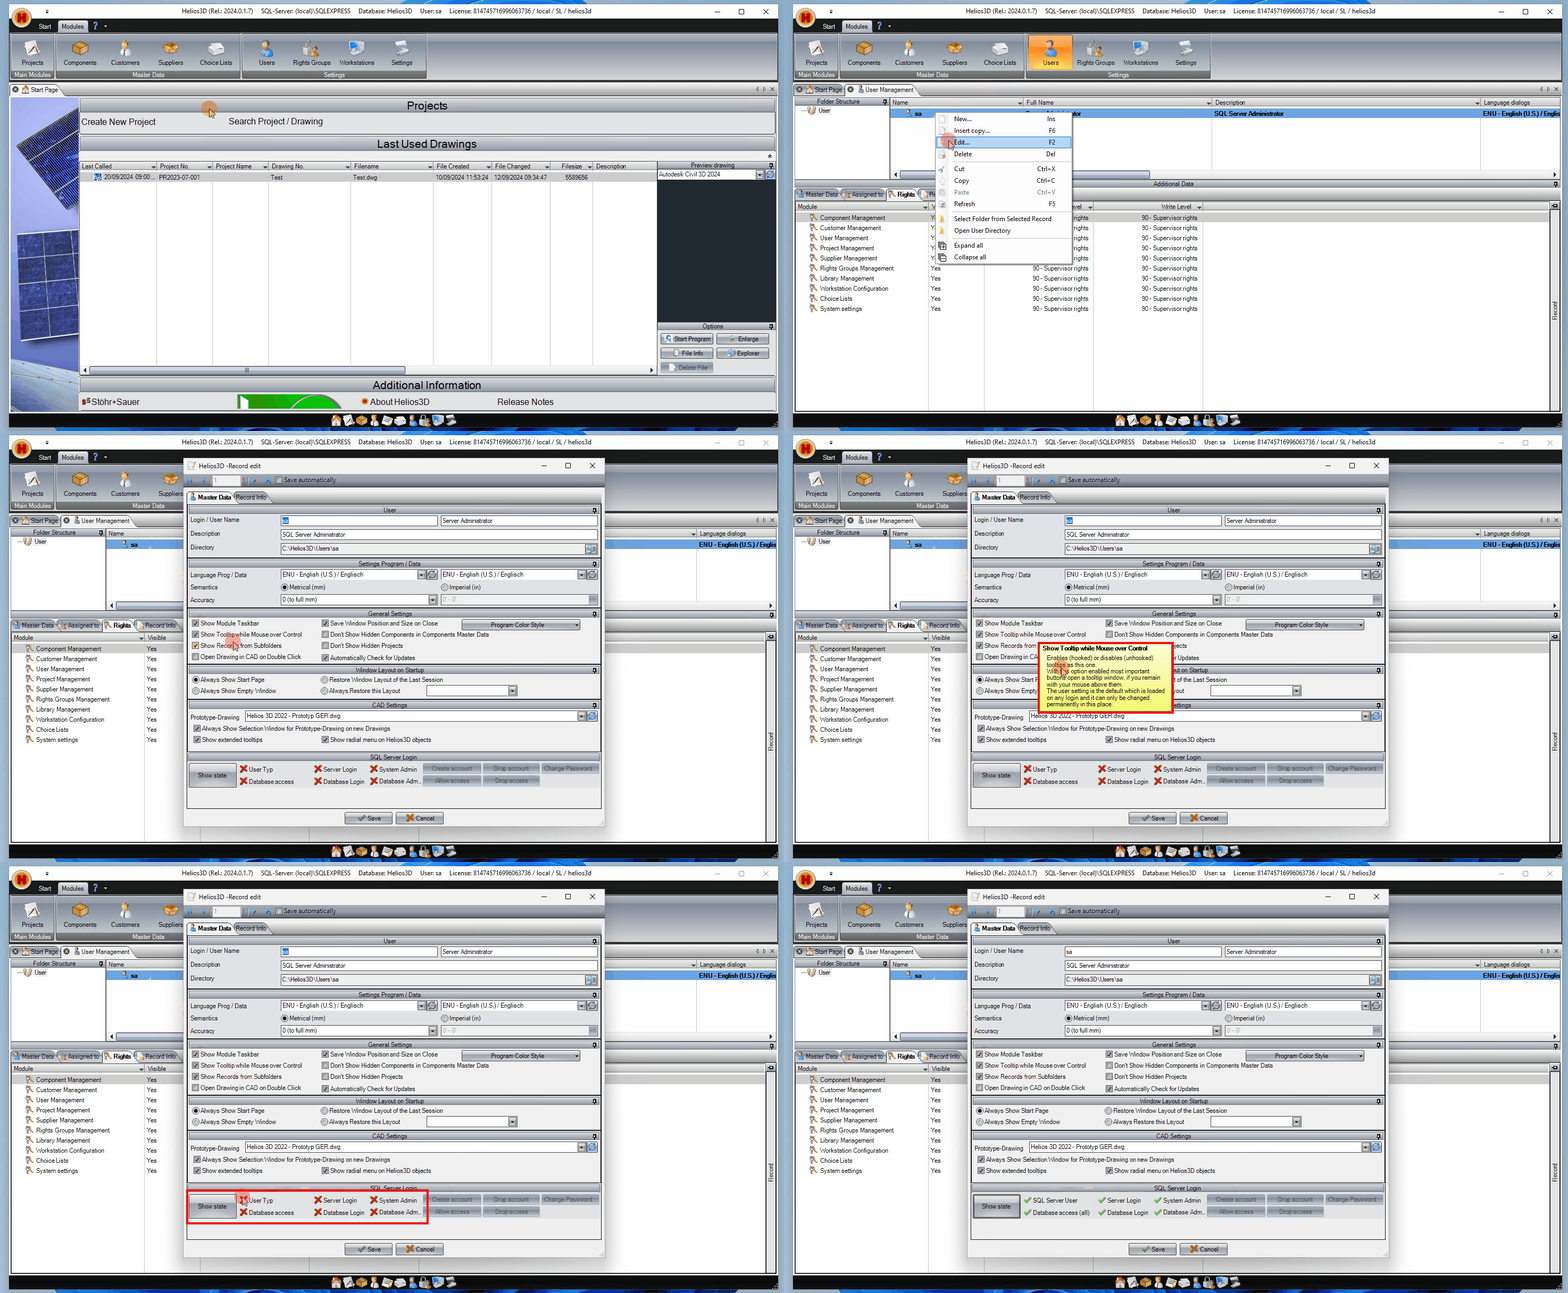
Login Name / Full Name
Here, the login abbreviation as well as the user’s full name are entered.
Description
Here, a description of the user profile can be entered.
Directory
Here, the full directory path where the user’s data is (or should be) located is specified.
Language for Dialogs
Here, the language for displaying dialogs can be selected. This setting is then used for the current user account. Changes take effect immediately, except for screens that are already displayed (e.g., the main interface) if an active profile is changed. At the latest, all interfaces will appear in the selected default language upon the next start of Helios 3D.
Language for Data
Here, the language for displaying data (descriptions, other language-dependent data) can be selected. This setting is then applied to the selected user account. If changes are not applied immediately, you can manually trigger this by selecting <Refresh>.
Unit Metric / Inch
Here, you can select the unit of measurement for all length values displayed in Helios 3D. Either the metric system or inches can be used.
This setting only affects the display in Helios 3D. The database always stores values in full millimeters.
Accuracy
Here, based on the chosen unit of measurement above, you can select the desired accuracy.
You can choose between whole millimeters and tenths of a millimeter, or between full inches and their respective fractions.
This does not affect the fact that the database always works with full millimeters and stores all values accordingly.
Show Quick Start Toolbar for Modules
If this option is enabled (checkbox selected), the Quick Start Toolbar for modules will be displayed at the bottom of the database application.
Show Detailed Help Texts as Tooltips
If this option is enabled (checkbox selected), tooltips will be displayed for most elements in Helios 3D. These provide information about the function of each element, as shown below for the current element.
Also Show Data from Subfolders
If this option is enabled (checkbox selected), all records from the selected folder, including those from its subfolders, will be displayed in the database application. Otherwise, records located in subfolders will not be displayed.
Always Save Window Position and Size on Close
If this option is enabled (checkbox selected), the size and position of windows will be saved and restored upon reopening.
Do Not Show Hidden Items in the Item Master
If this option is enabled (checkbox selected), items in the item master will be hidden from you if the „hide“ option is set in the item data.
Do Not Show Hidden Projects
If this option is enabled (checkbox selected), projects in the project management will be hidden from you if the „hide project“ option is activated in the project data.
Open Drawing in CAD on Double-Click
If this option is enabled (checkbox selected), you can open drawings by double-clicking on the drawing name.
Window Layout on Start
In this section, you can see whether the homepage, the window layout from the last session, an empty window, or a specific layout is loaded when the database application starts. The latter can be created in the start menu under „Window Layouts.“
Login
This section currently does not have any functions used in Helios 3D.
Prototype Drawing
Here, you can select which prototype will be used when creating a new drawing.
Always Show Prototype Selection Window for New Drawings
If this option is enabled (checkbox selected), the prototype selection window will always be shown when creating new drawings. Otherwise, the preset prototype will be used automatically.
Show Extended Tooltips
If enabled, the standard AutoCAD tooltips for registered objects will be overridden by Helios 3D-specific information.
Show Radial Menu on Helios 3D Objects
If enabled, a radial menu with available commands will be shown for AutoCAD objects supported by Helios 3D. The offered commands will match those of the context menu.
To access it, the user must hover the mouse pointer over the object and press the ALT key once, unlike with the tooltip.
Show state SQL Server Login
To display the user’s permissions for accessing program functions in Helios 3D, press the „Show state“ button. If green checkmarks are displayed, the user has the corresponding permissions. The „System Admin“ and „Database Admin“ permissions are important for working with all modules of Helios 3D.
Adding a User Account (optional)
This step is optional, because on the default installation a Windows user and the ‘sa’ user automatically get created.
For creating user accounts, you will need an Microsoft SQL Server Management Studio Express and administrator access for the SQL server.
The recommended workflow equals the structure of these instructions.
Add User to SQL Server
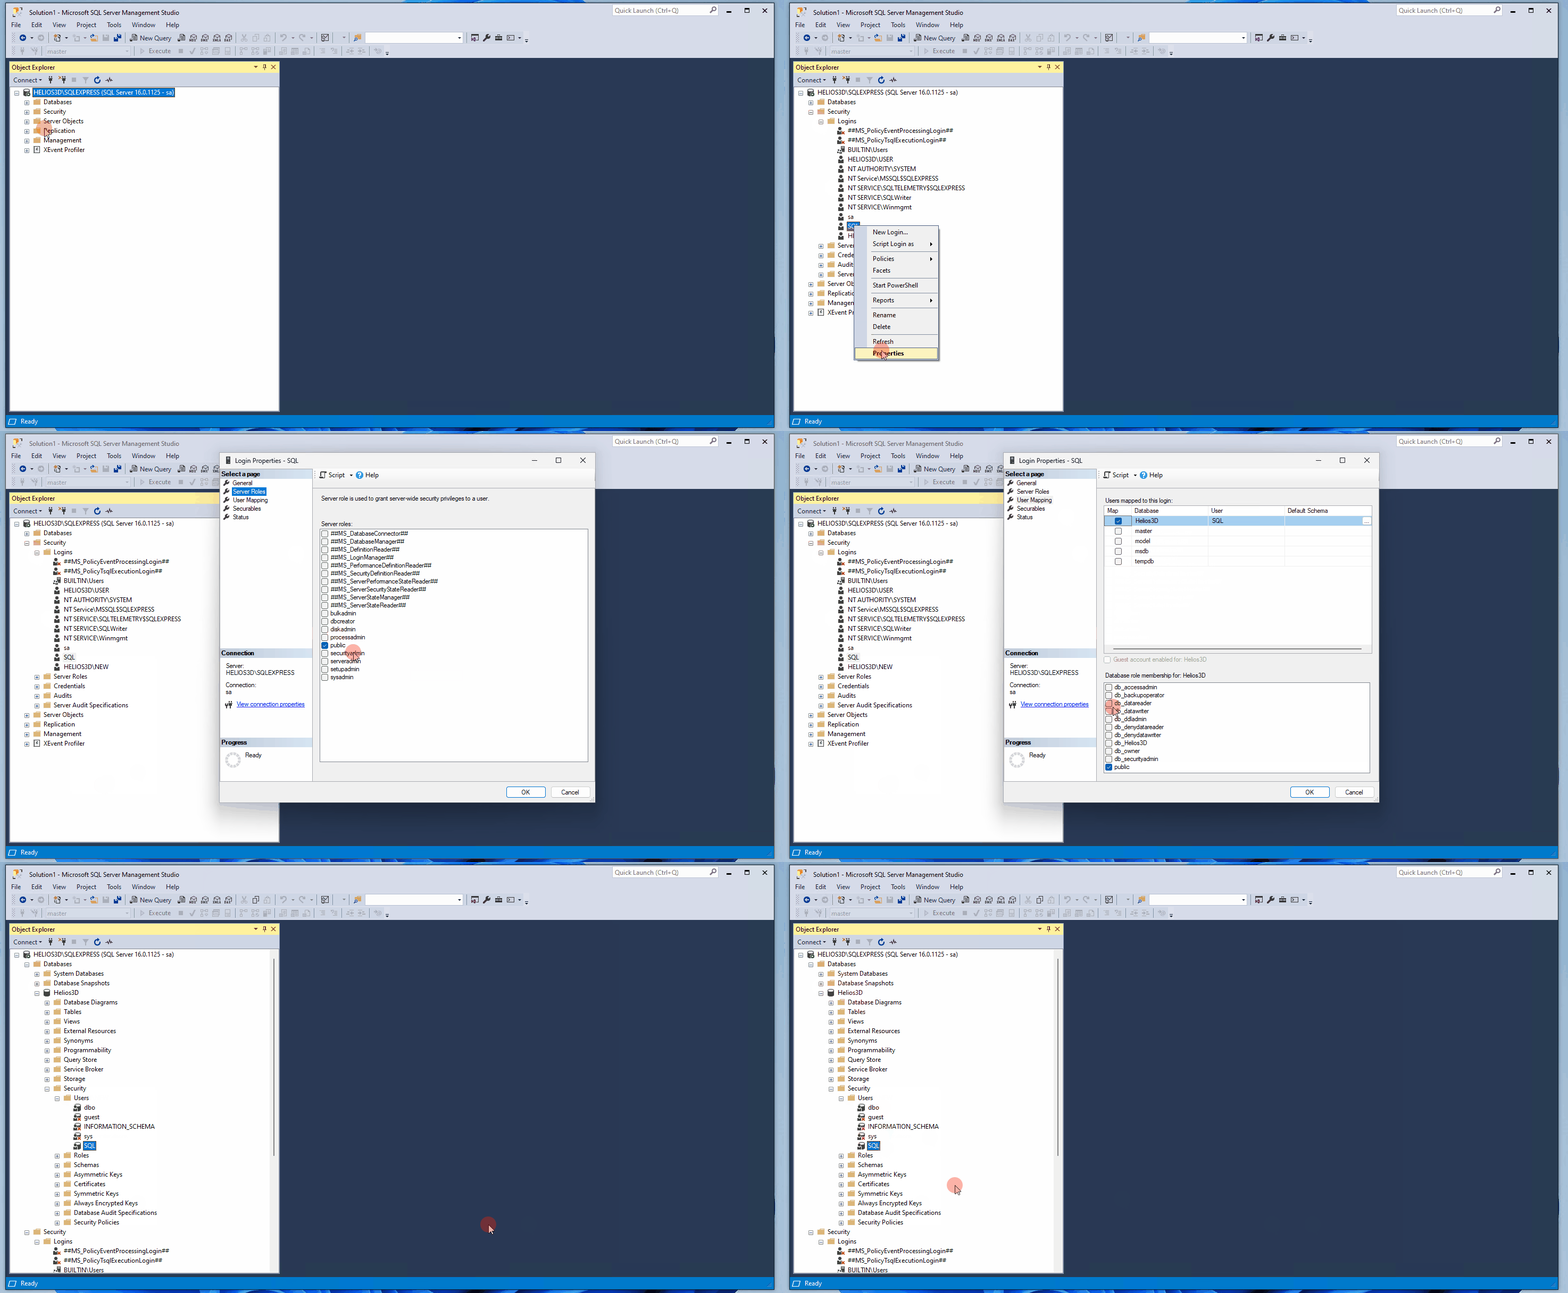
First a new user needs a login for the SQL server. For that an administrator has to login to the server and he has to create a new user login in Object Explorer. Just open the structure tree and go to the point “Server Name\Security\Logins”, right click it and select “New login…”.
The dialog for creating a new login is separated into several pages. You only need the pages “General” and “Server Roles”.
Page General
On “General” page you can enter the login information for the new account, as displayed in the following figure.
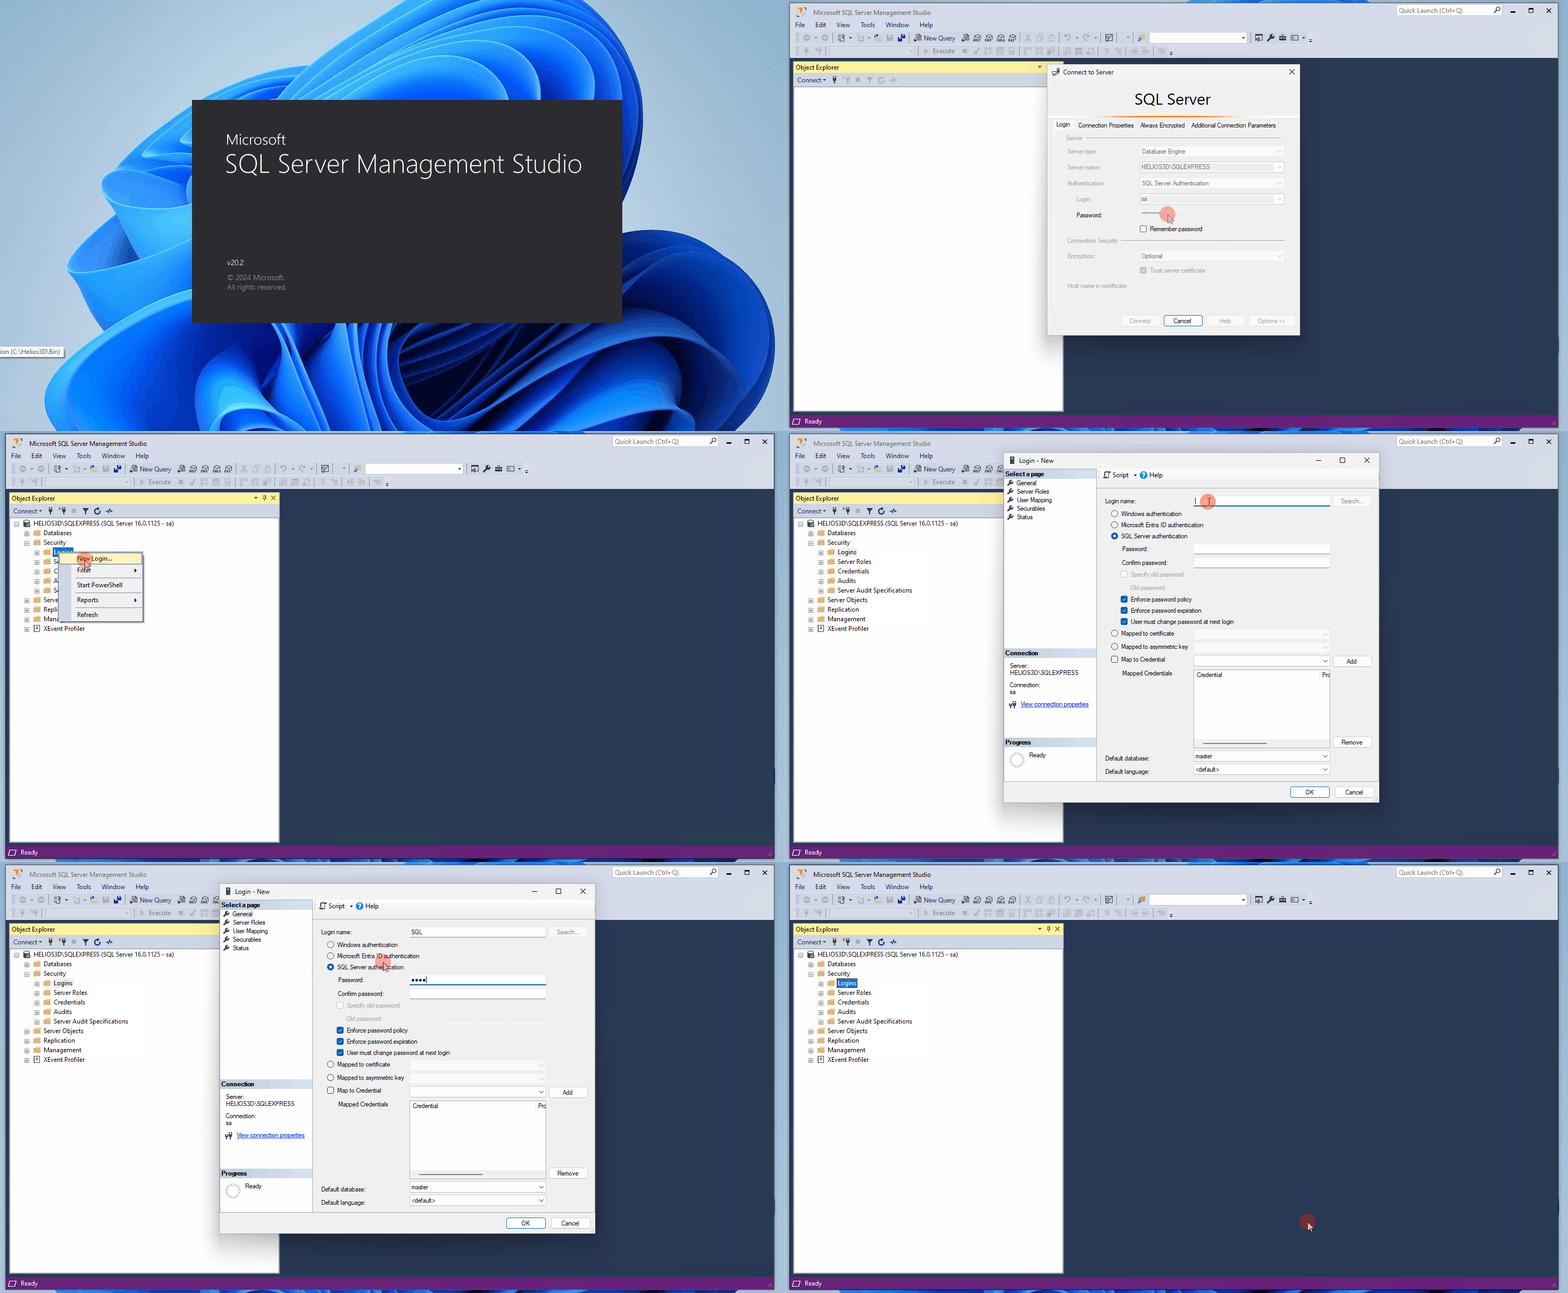
Here you can create a new login or you can select a Windows-Authentication account and use it for the SQL server.
For SQL Server-Authentication please go on with the data concerning the password.
For Windows-Authentication please push <Search…> and then click <Advanced> in the upcoming dialog.
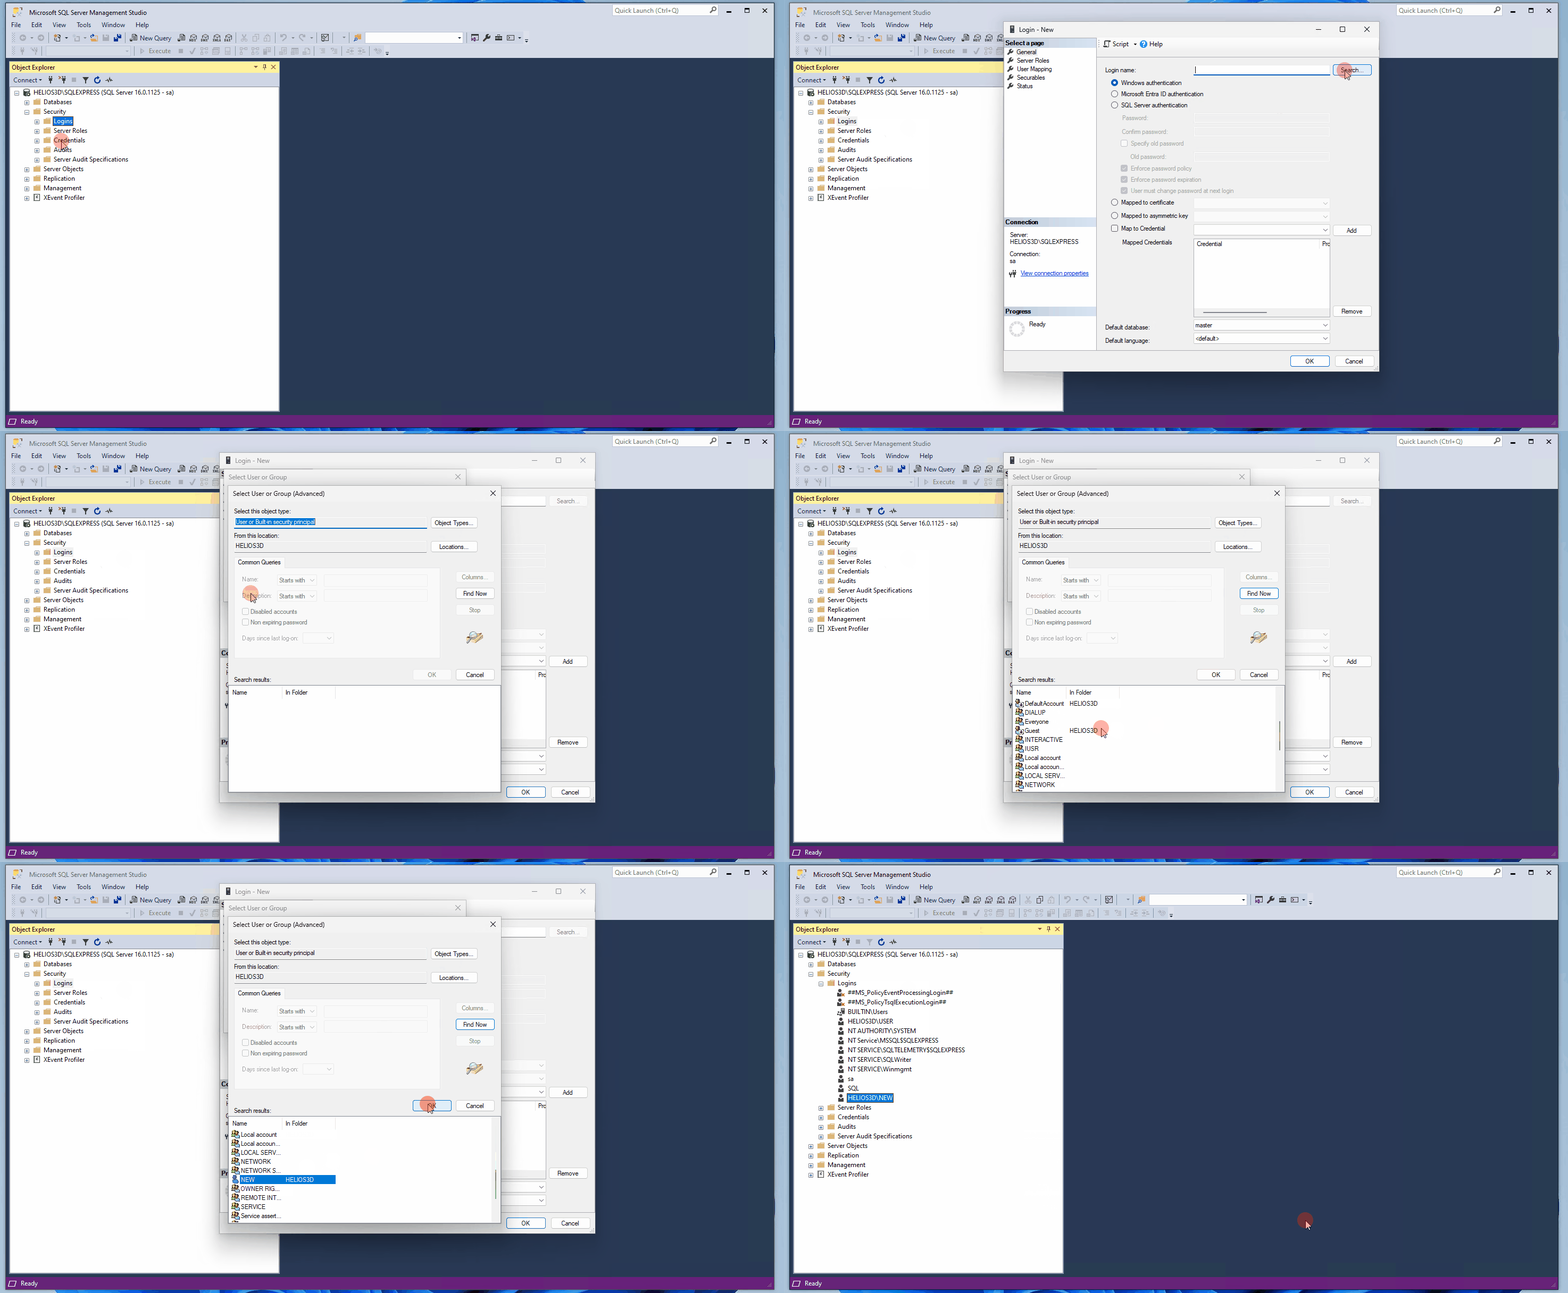
The next figure shows the extended selection dialog for users or user groups. There you can use the <Find Now> button to read and to display all login accounts available in the “Search results” list.
| Important note: Any user needs his own user account entry (section “User Account Helios 3D Application”) for the Helios database, even if you use user groups for login to the server! |
Close all selection dialogs for users and groups with <OK> and go to the “Server Roles” tab.
Page Server Roles
On “Server Roles” page you can set the server wide security permissions for the user. Any user at least needs the role “public” for working with Helios 3D, as displayed below.
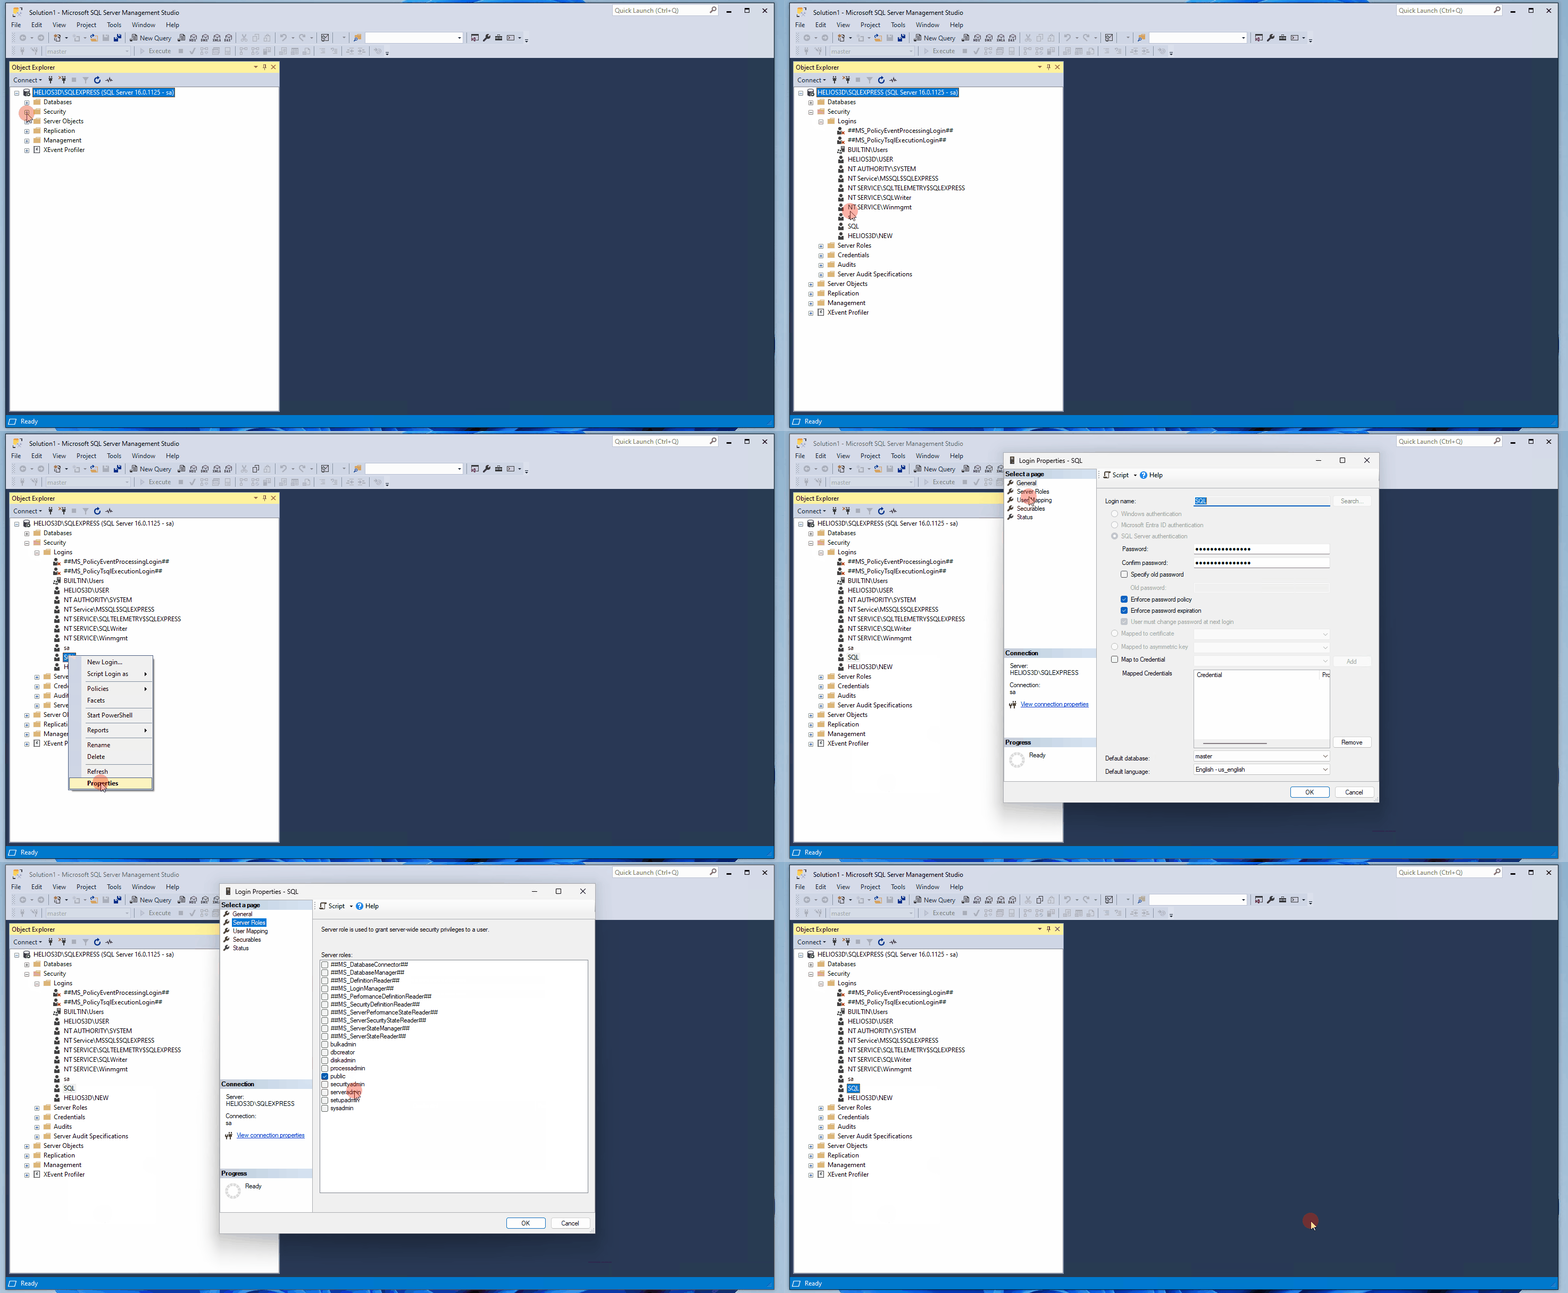
Another permission needed is locking records on SQL server. Logins with administrator rights automatically get this permission, whereas other logins need it to be granted by hand.
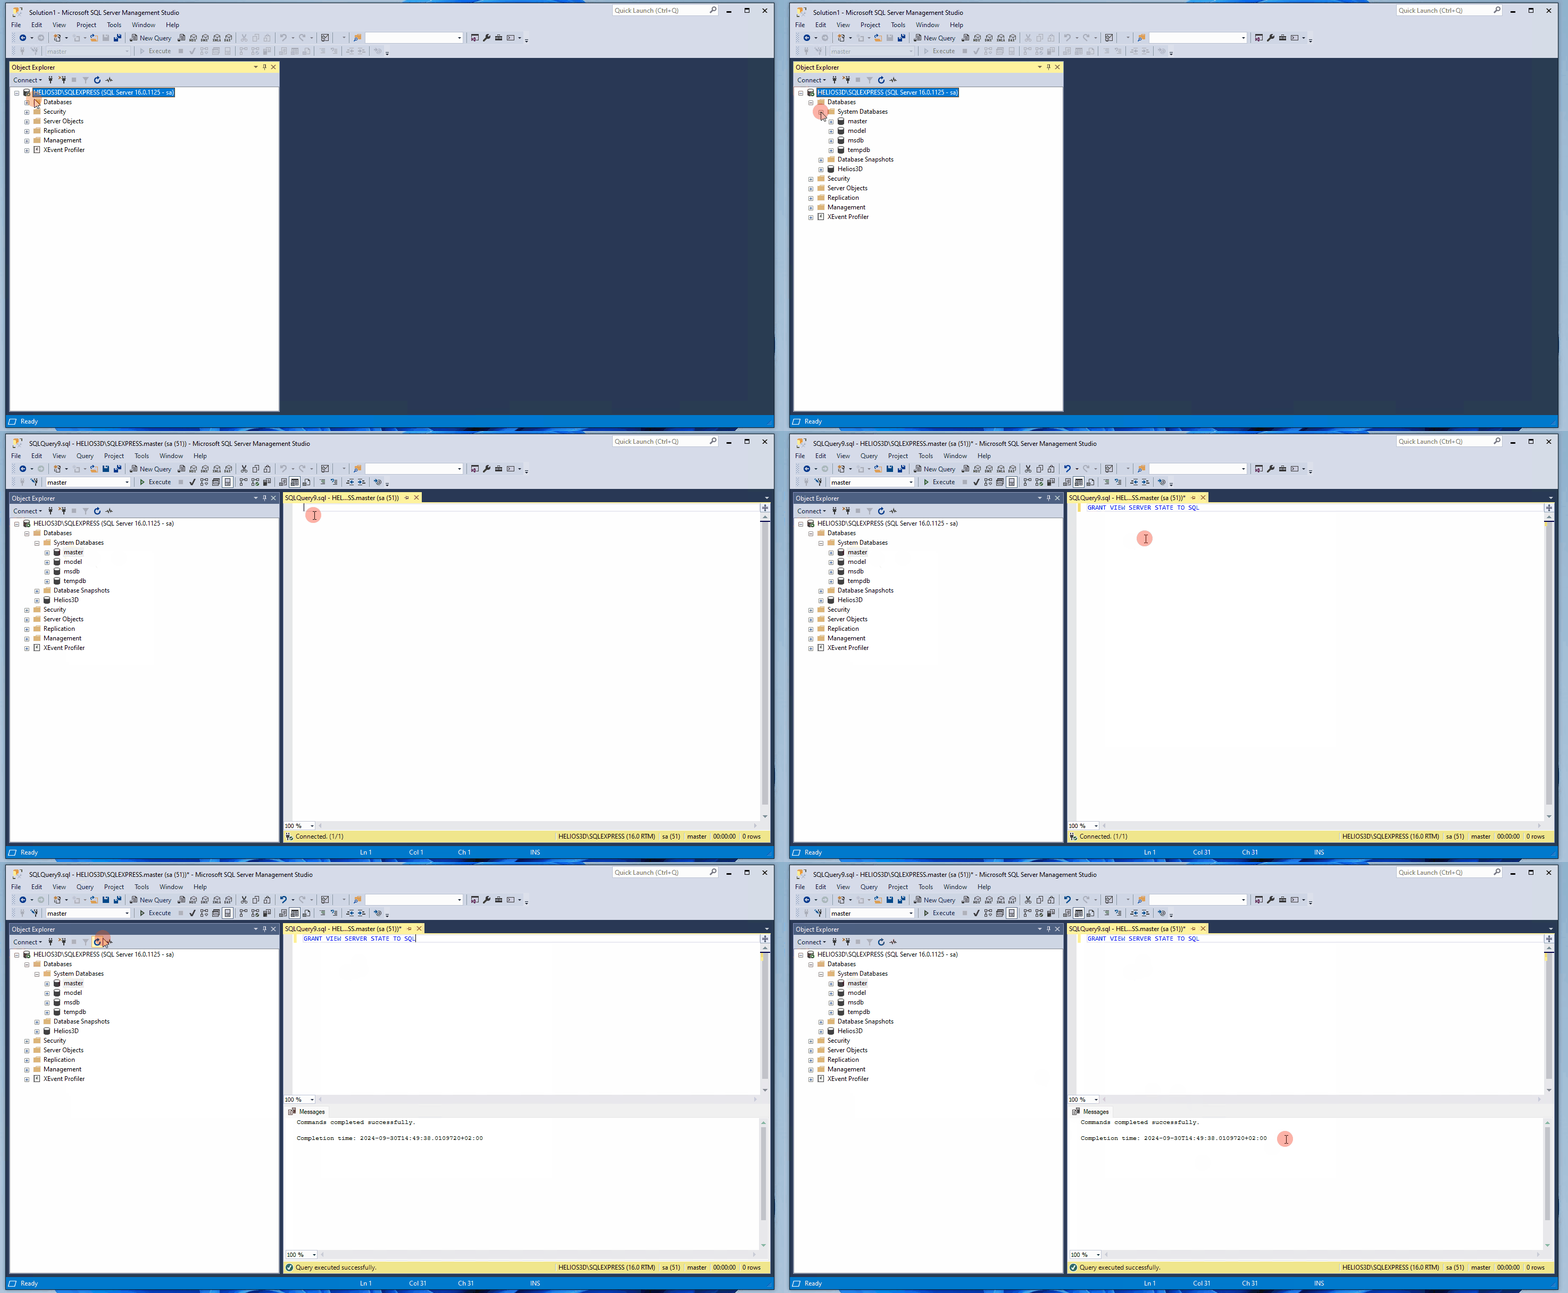
For that, an administrator (‘sa’) hast to run one of the following commands, depending on the login method, on ‘master’ database:
For Windows-Authentication:
GRANT VIEW SERVER STATE TO [Domain\Login]
For SQL Server-Authentication:
GRANT VIEW SERVER STATE TO [Login]
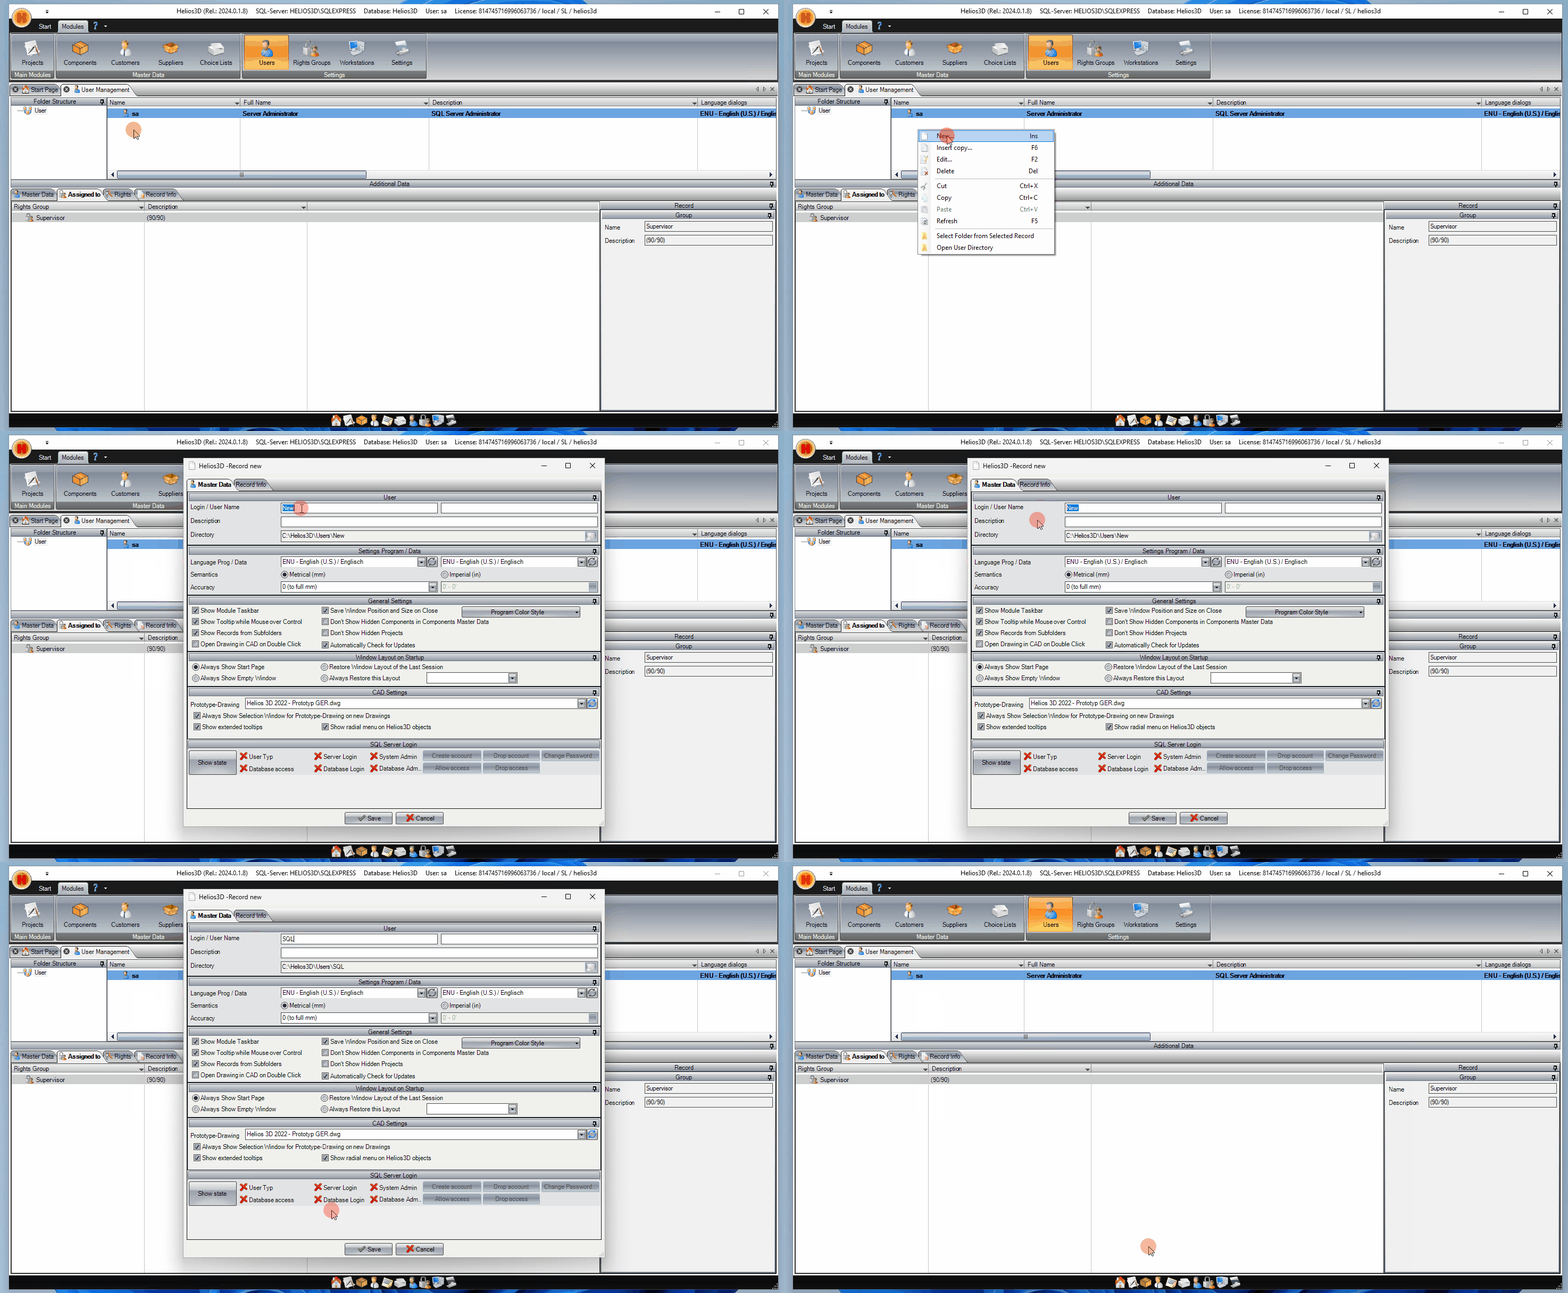
Another way to add a user is directly in the user management of Helios 3D. Go to the „User“ module. Then right-click in the field where the users are listed. Click on ‚New…‘. A dialog opens where the new user can be created. The only required input is the username. Then click on ‚Show state‘. Helios 3D will now check if a user with this name already exists in the SQL database.
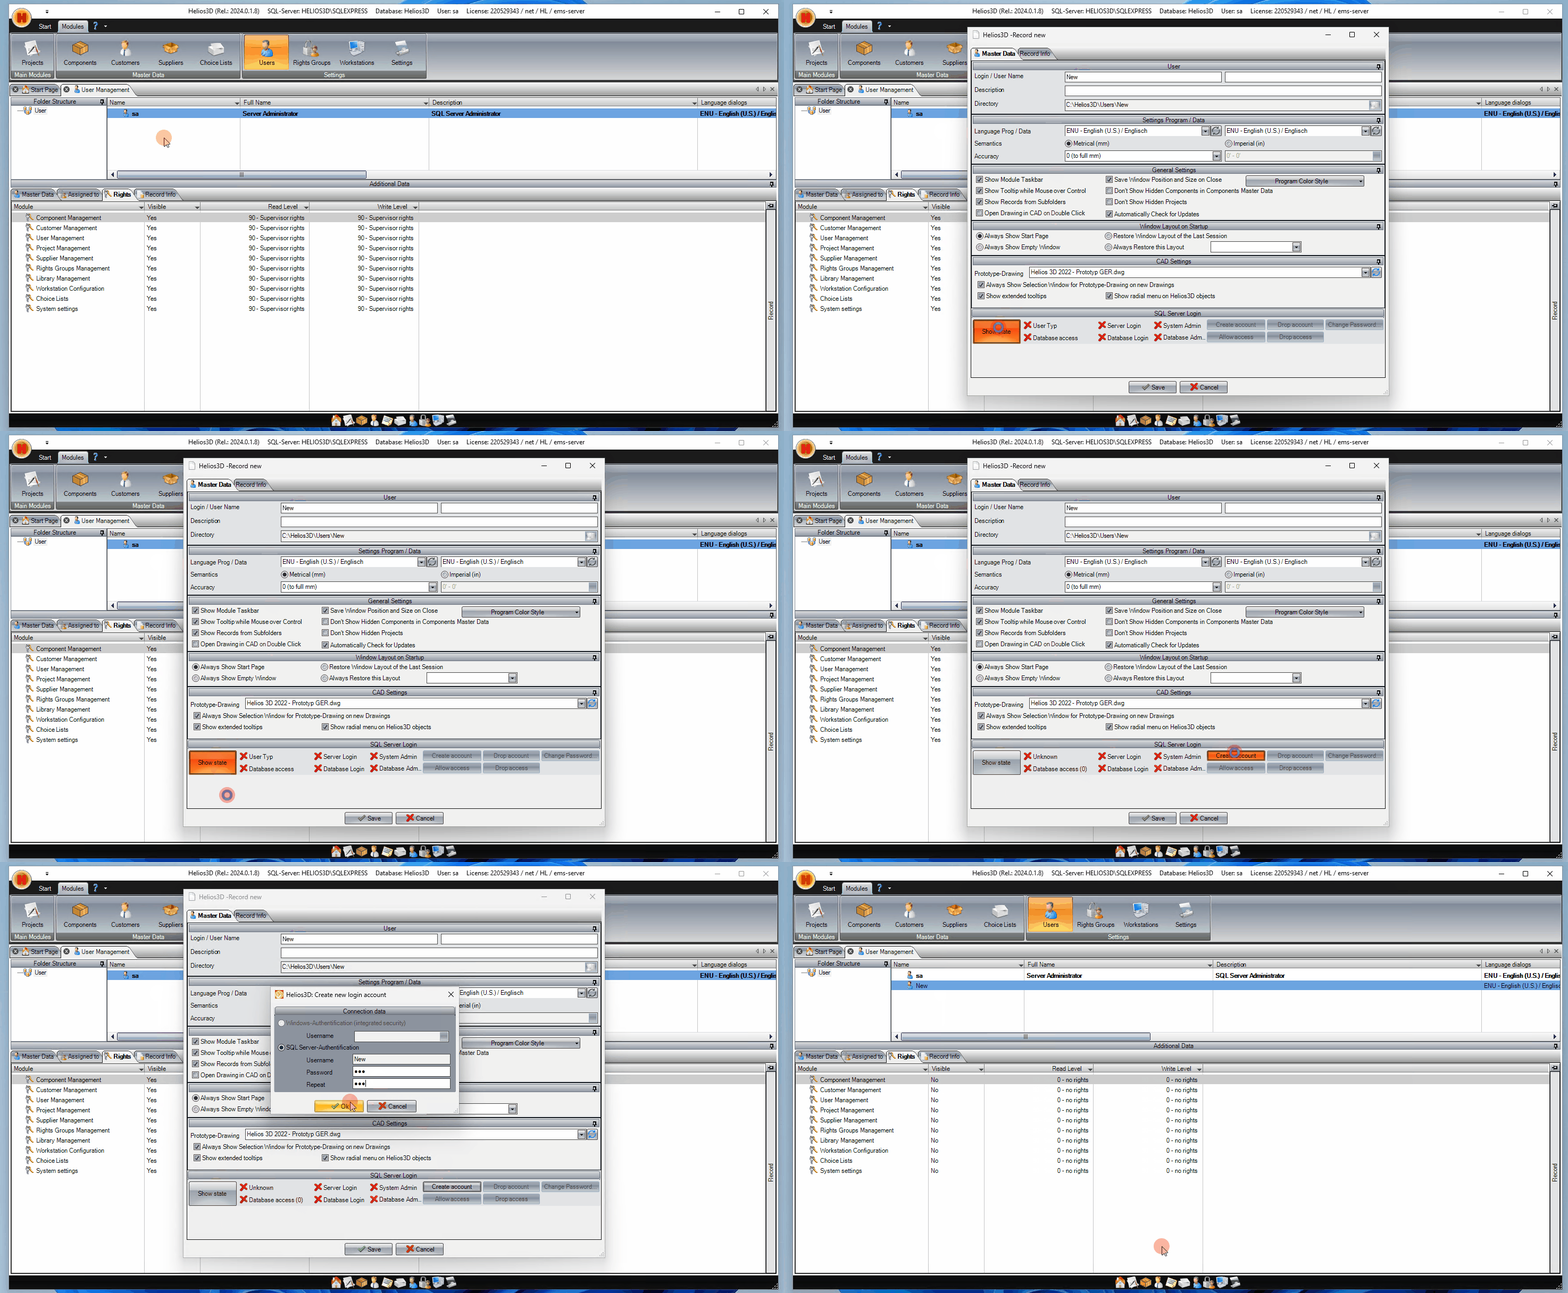
If the user is found in the database, green checkmarks in the „SQL Server Login“ area will indicate which permissions this user has in the SQL database. If not, click on ‚Create account‘ to create a user in the SQL database. In the window that opens, you can now set a password for the new user. Helios 3D will create the user in the SQL database. With ‚Save‘, you save the user in the user management of Helios 3D. You can then proceed with the permission assignment for the user as described below.
User Account Helios3D Database
For accessing the Helios 3D database, a user account (can be named equal to the login account) for any user is needed. For that an administrator can go to “Database Name\Security\Users” in Object Explorer and there he can right click “Users” and select “New User…”.
The dialog for creating a new user account is separated into several pages. You need to go to the pages “General”, “Owned Schemas” and “Membership” (for the roles) as marked in the next screenshot.
Here you can enter a login name and you can select the corresponding login, created like described in section “Page General”.
Required Schemes:
- db_Helios3D
Required memberships in database roles:
- db_datareader
- db_datawriter
- db_Helios3D
User Account Helios 3D Application
In Helios 3D database application, any user needs a user account named equal to the corresponding user account for the SQL Server.
Please follow this procedure:
- Start Helios 3D with administrator permissions (the user ‘sa’ would be ideal).
- Open the User Management.
- Right click the user list -> “New…”
- Enter a login name as displayed in the following figure and press <OK>.
- Select the new user (line appears blue then) and go to the “Assigned to” tab in “Additional Data” frame below the users list.
- Right click the list and select the option “New Assignment…”.
- In the following dialog you can select one or more rights groups and afterwards press „Accept“ . After that you can close the dialog.
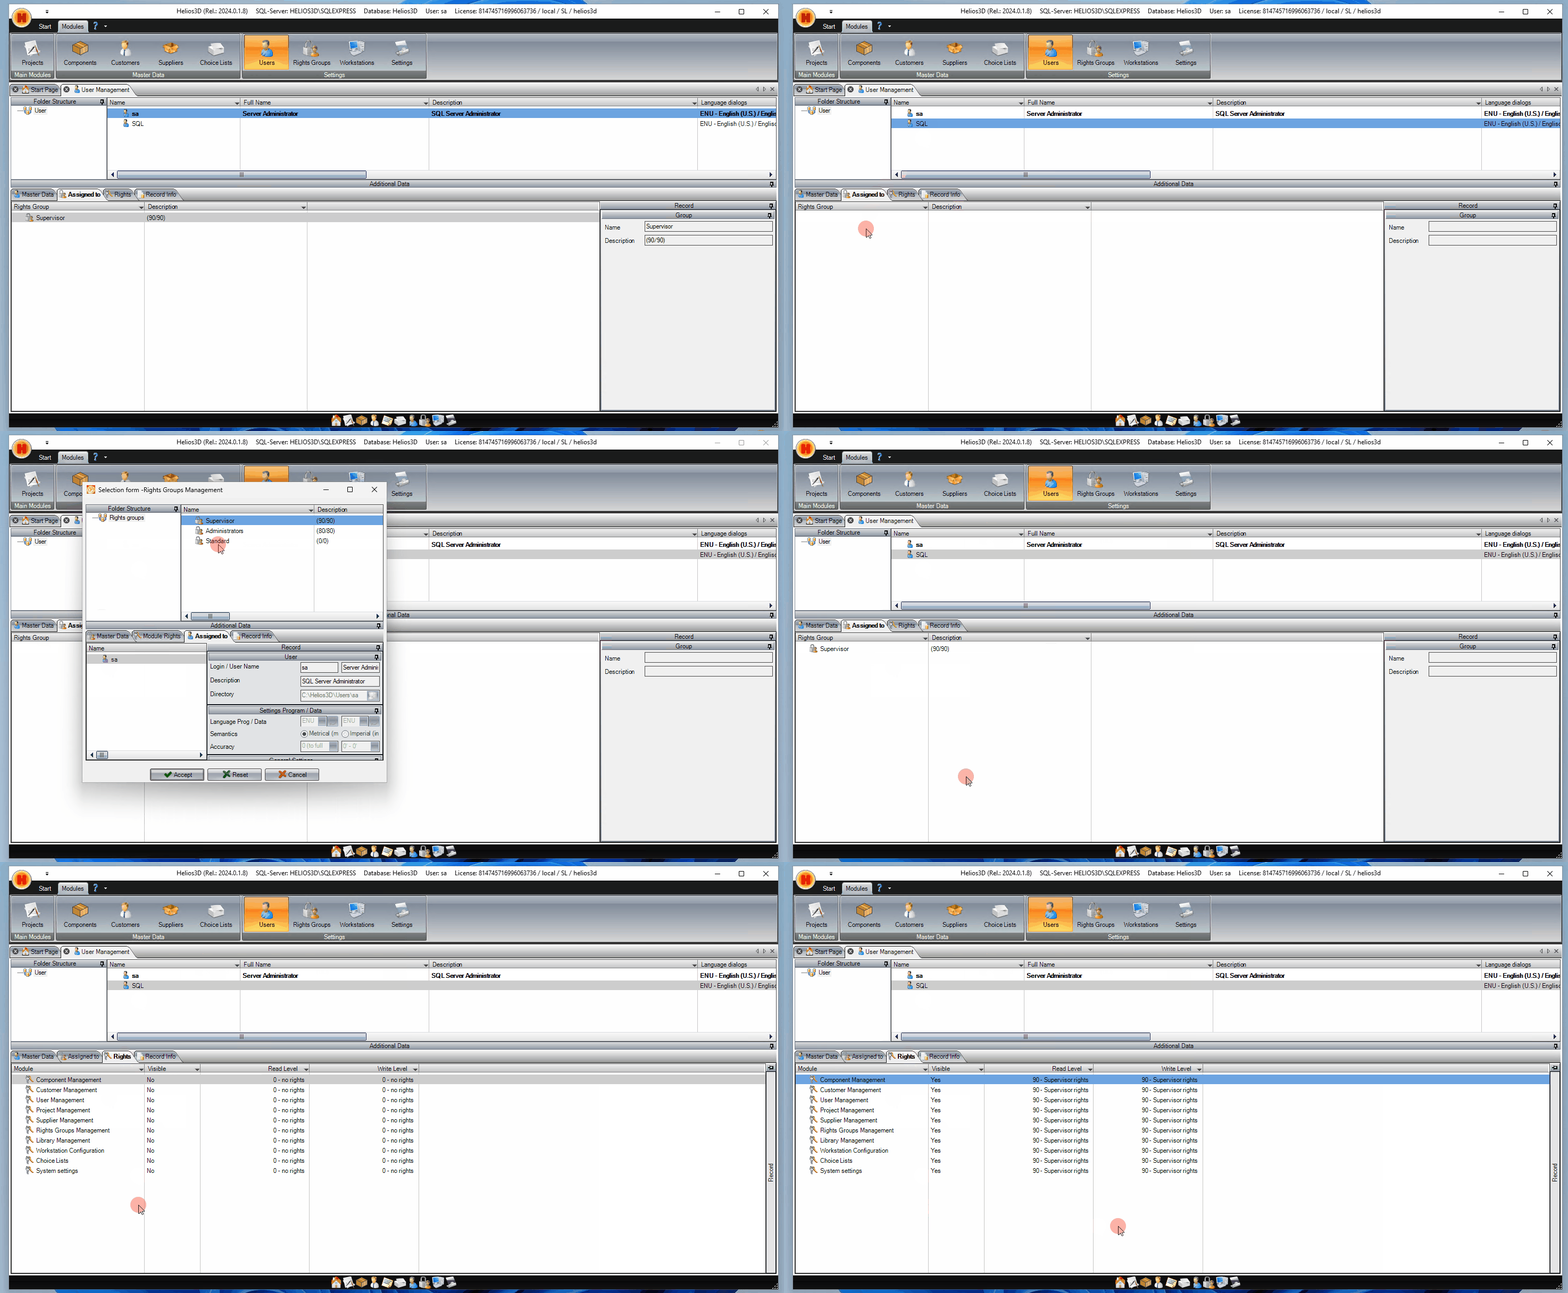
- When you go to the “Rights” tab (next to “Assigned to” tab), the corresponding rights should be displayed. If necessary, please press F5 to refresh the list view.
Now the user is able to login.