UI Principles
General Information
This documentation provides a concise introduction to the user interface and is intended to facilitate the onboarding process for users. The dialogs are described in a logical order from top to bottom, where appropriate, to help with navigation. The latest version of documentation can be downloaded directly through the application’s help section.
Overview of Helios 3D Program Components
Helios 3D consists of two main parts: a database application for managing projects and the Helios 3D Palette, an extension for Autodesk Civil 3D.
Database Application
When Helios 3D is launched, the database application is initiated. To access it, you need to log in with the credentials that were set up during the installation process.
After logging into the database, a window appears that, by default, displays the Start Page for the user.
Here is a detailed description of the various elements of the window:
In the illustration below, you can see an overview of the control elements.
Helios 3D symbol
By clicking on the sun symbol (which may also appear as a tab, depending on the settings), the following menu opens:
Reconnect
Here, you can reopen the login dialog and either connect to a different database or, for example, disable automatic login.
Backup Database
Here, you can create a database backup without using SQL Server Management Studio.
| For this, you need administrative rights on the SQL server. |
The backup file will automatically be saved in the SQL server’s default directory:
“C:\Program Files\Microsoft SQL Server\MSSQL16.SQLEXPRESS\MSSQL\Backup”.
Even in a client-server environment, the file will still be located on the server afterward!
Restoring a database, however, can only be done via SQL Server Management Studio.
Helios on the Internet
Here you will find links to the Helios 3D website, the associated forum (which offers, among other things, the latest updates on the program and documentation), and the STÖHR+SAUER GmbH website.
Search for Update
Here you can search for updates online. If an update is found on the server, you can download and install it.
About…
Here you can display the information shown below.
The information in the upper dialog section, particularly regarding the program and database versions, is often required in support cases. The entry „Dongle“ contains information about your license and its duration.
Title Bar
At the very top, the title bar displays the program name „Helios 3D (Rel.: 2024.0.1.7).“ It also contains information about the SQL server used, the database (Helios3D), the username („sa“), and the license number.
Start Ribbon
On the Start Ribbon, you will find the main functions of the database application. Some of these functions are also available in the context menu of a record.

- Under Edit, you will find Helios functions for creating, copying, editing, and deleting an entry in the currently focused area of the application.
- Under Clipboard, you will find Windows clipboard functions for Cut, Copy, and Paste. You can also use the Windows shortcuts as an alternative.
- Under Export/Import, you can export or import projects and drawings.
- The View command group allows you to update all records and access the home page of the database application.
- Under Reports, you can access the print dialog for system reports.
- The Window Layout command group contains various options for arranging the application’s windows and saving them in a fixed profile. You can also close all open modules.
- In the Settings command group, you can influence the behavior of the Helios system. „Show data from subfolders“ means that the folder structure will also display contents from subfolders, not just the direct folder contents. „Show quick launch bar“ toggles the quick launch bar described further down in this section. „Show help texts“ controls the display of yellow help boxes (tooltips) that appear when you hover the mouse pointer over an element (if the checkbox is checked).
Modules Ribbon
In the modules ribbon, you can access the individual modules of the database application. Alternatively, you can use the quick launch ribbon for modules, so you don’t have to constantly switch between the taskbar and the module bar.
By clicking on the respective module switch, the module is opened, and the switch of the displayed modules is highlighted.
Module Quick Start Bar
This quick launch bar allows you to access all modules, potentially replacing the need to switch to the module bar.
Helios3D CAD
Helios 3D offers numerous options for interactive assistance during use. The mouse pointer displays different functions when hovering over objects or menus. Depending on whether it is used in the Autodesk Civil 3D area or in the menu of the Helios 3D application, its behavior changes. In the menu, it shows tooltips and responds to a right-click, which brings up additional sub-functions and menus that users can choose from. In the Autodesk Civil 3D area, i.e., the CAD section, it either provides information such as height above ground or displays specific data for Helios 3D objects, such as table information or cable data.
Helios 3D enhances Autodesk Civil 3D with a tool palette that provides all available functions. This palette is typically displayed automatically. If it has been hidden, you can make it visible again through the extended context menu in Autodesk Civil 3D. When no objects are selected in Autodesk Civil 3D, right-click in the drawing to open the context menu. Then, under „Helios 3D – More Commands,“ select the option „Show Palette…“
Tooltip Helios3D Palette
When you move the mouse cursor over a menu item in the CAD area of Helios 3D, a tooltip appears that provides you with more detailed information about the selected menu item. This tooltip contains useful explanations and hints that help you better understand the function and application of the respective menu item. This allows you to quickly access additional information at a glance without having to actively select the menu item or invoke a separate help function. This context-sensitive support significantly simplifies navigation and the use of CAD tools in Helios 3D.
Mouse Right Click Helios 3D Palette
If you right-click within the Helios 3D palette, a context menu will appear, offering you a wide range of additional functions. These functions provide extended options that go beyond the standard tools and help you work more efficiently and flexibly within the program.
Data for Helios3D Objects
When you move the mouse cursor over a CAD object in Helios 3D, a tooltip appears that displays specific information about the object. This tooltip contains important details, such as the object’s properties, its function within the project, or relevant technical data.
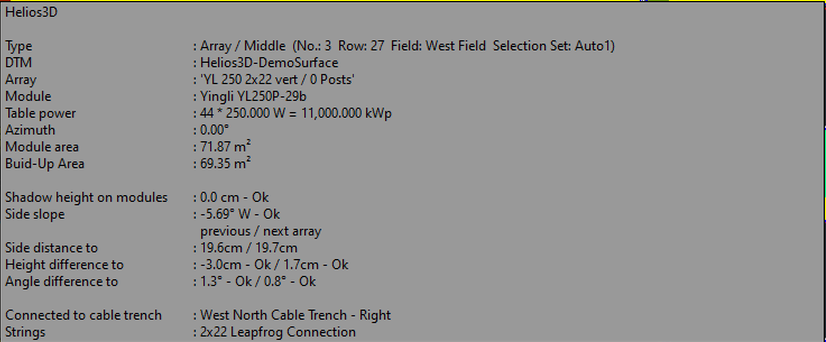
Additionally, the tooltip may offer helpful hints for interacting with the object or provide further information on its application and configuration. This allows you to quickly and easily access all essential information without having to click on the object or open additional windows. This feature facilitates efficient work with the various objects in Helios 3D and improves overall project management within the CAD environment.
Mouse Right Click Helios Object Civil 3D
A right-click on a Helios 3D object opens a context menu that provides a range of additional functions specifically designed for working with Helios 3D. These advanced functions allow you to quickly access useful tools and commands that are not available in the main user interface, enabling you to edit and customize the Helios 3D objects more efficiently and flexibly.
Radial Menu at the Cursor
The radial menu can be used as an alternative to AutoCAD’s ROLLOVERTIPS by pressing the <ALT>-key. When the mouse cursor hovers over an AutoCAD object, the tooltip will appear if enabled, and pressing <ALT> will open the radial menu instead.
To activate the radial menu, adjust the settings either in the HELIOS 3D user account or within the Civil session options. These options can be accessed by clicking the program icon on the HELIOS 3D palette.
This menu provides you with a selection of context-sensitive options and functions that are directly related to the selected object. The radial menu allows for quick and intuitive navigation by displaying the most important commands in a circular format. This way, you can perform various actions with minimal effort, without having to navigate awkwardly through menu bars or toolbars. This feature facilitates efficient interaction with CAD objects and speeds up the workflow in Helios 3D.
| If the radial menu is activated with the <ALT>- key, be sure to release the key before clicking on an icon. |
When you click the icon, the associated options will appear and can be selected with another left-click.
You can close the menu by clicking the pencil icon in the center or by clicking elsewhere in the drawing. Certain points, such as „Electric“, may include additional command collections. To access these extra options, click the arrow icon.
Activating the extension modifies the menu as shown below. To return to the top command level, click the arrow icon in the center.
You can close the radial menu at any time by clicking anywhere in the drawing area.