
General UI Structure
Purpose of the General UI Structure
This article explains the basic structure of the Helios 3D CAD user interface. It helps users understand where the main tools are located and how the vertical and horizontal menus support the planning workflow. The page is intended as an orientation topic for new users before they start working with projects, drawings, placement tools, electrical planning functions, analysis commands, or output functions.
The Helios 3D CAD interface is divided into two separate menus: a vertical menu and a horizontal menu. The vertical menu is located on the left side of the workspace and provides access to frequently used tools and functions. In contrast, the horizontal menu spans the top of the screen and contains advanced options as well as specific commands required for working in the Helios 3D CAD environment. This clear separation of the menus enables easy navigation and facilitates quick access to the necessary tools and settings.
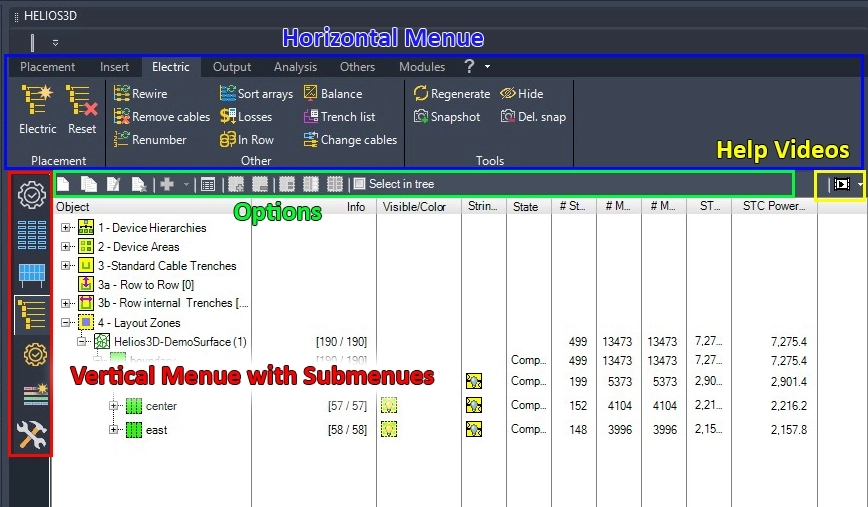
How to read the interface overview
The screenshot gives a visual overview of the menu layout in the Helios 3D CAD environment. Use it to identify the general position of the vertical menu and the horizontal menu before opening more detailed Help-Center articles for individual commands or modules. The image does not replace the command-specific documentation, but it helps users understand the overall navigation concept.
Vertical Menu (Main Modules)
The vertical menu encompasses the core modules of the CAD section of Helios 3D, making it the centerpiece of the software. In this menu, you will find all the main functions necessary for creating, editing, and managing 3D models. Each module is clearly structured and designed to optimize workflow by providing quick access to the most essential tools and settings. This arrangement makes it easier for the user to efficiently navigate between different modules and handle complex tasks within the CAD part of Helios 3D.
Vertical menu in the planning workflow
The vertical menu is primarily used for workflow-oriented access to important Helios 3D functions. It supports users when they move through typical PV planning steps such as project setup, layout preparation, array placement, object editing, electrical planning preparation, analysis, and result review.
The exact available modules and commands can depend on the active project, the current drawing, the installed Helios 3D version, and the configured workspace. If a function is not visible, users should first check whether the correct drawing, project context, workspace, and module state are active.
Horizontal Menu
The horizontal menu provides access to commands that are arranged across the top of the CAD workspace. It is used for command groups, advanced tools, and functions that are required while working in the Helios 3D CAD environment.
In daily work, users usually combine both menu areas: the vertical menu helps to access major workflow modules, while the horizontal menu provides additional commands, settings, and tools for the active planning task.
Typical use during PV project planning
In a PV project, the user interface structure helps users move from general project and drawing preparation to detailed layout work. A typical workflow may include opening or creating a project, preparing the drawing environment, defining placement areas, working with array or module table definitions, placing arrays, checking results, continuing with electrical planning, and generating outputs or reports.
This article does not describe these steps in detail. It provides the navigation context so that users can understand where to look for the relevant tools in the Helios 3D CAD interface.
When commands or menus are not visible
If a menu, module, or command is not visible, first check whether the correct Helios 3D workspace is loaded and whether the required project or drawing context is active. Some functions may only be relevant after a project has been opened, after a drawing has been assigned, or after the required workflow step has been reached.
If the interface looks different from the screenshot, compare the installed software version, the active AutoCAD/Civil 3D workspace, screen resolution, and any customized UI settings.
Related topics
For more detailed information, continue with the related Help-Center topics for UI principles, project management, vertical menu commands, horizontal menu commands, array placement, electrical planning, analysis, and output. These articles explain the specific commands and workflows that are only introduced at a structural level in this overview.