Installation
Helios 3D is an application based on AutoCAD Civil 3D and a Microsoft SQL database. It manages multi-user data handling and provides a storage environment. Helios 3D can be used within a company network and, with a VPN connection, even globally for distributed offices. The database stores and shares all information and documents.
This article describes the basic installation scenarios for Helios 3D. It covers local installations, network installations, SQL Server access, first startup, workstation configuration, Autodesk Civil 3D prerequisites, Sentinel driver installation and license server setup.
Before starting the installation, decide whether Helios 3D will be used as a local single-workstation installation or as a shared network installation for multiple users. This decision affects the installation path, SQL Server setup, file sharing, client configuration and later update handling.
Use the following requirements as a preparation checklist before installing Helios 3D. In addition to hardware performance, check the required Autodesk Civil 3D version, SQL Server availability, Windows permissions, firewall settings and network access if Helios 3D will be used by more than one workstation.
System Requirements
Due to the enhanced performance of commercial computers, the software combination of Autodesk Civil 3D and Helios 3D can be used on nearly every modern computer.
Recommended requirements:
Modern Intel or AMD – 64 bits – Processor (at least 3,0 GHz or more)
A higher clock rate is recommended, as just a single core is used!
- Windows 11 and 10
- Fast SSD
- 32 GB RAM or more
- 20 GB free disc space for a Helios 3D and Autodesk Civil 3D system
- 1920 x 1080 screen resolution with 32-bit color depth (True Color)
- Modern high-end or Autodesk certified graphics adapter
Autodesk recommends the following features:
- Basic: 2 GB GPU with 29 GB/s Bandwidth and DirectX 11 compliant
- Recommended: 8 GB GPU with 106 GB/s Bandwidth and DirectX 12 compliant
Note:
- DirectX 12 with Feature Level 12_0 is required for some features.
- Dedicated VRAM recommended.
To use Helios 3D with a CAD, Autodesk Civil 3D 2021 to 2026 must be installed and we recommend doing the Civil installation in advance. To use networks, TCP/IP must be set up.
The latest service packs for Autodesk Civil 3D should always get installed.
Helios 3D CAD-workstations may have higher requirements according to the used version of Autodesk Civil.
A preinstalled Microsoft SQL Server (Express) is required for adding a database catalogue during Helios 3D installation.
Before installation, verify that Autodesk Civil 3D is already installed and updated, that the SQL Server instance is available, and that the Windows user running the installation has sufficient permissions.
For network installations, also verify that TCP/IP communication is available between clients and server and that the required SQL Server services and firewall rules can be configured by the responsible IT administrator.
Important Note on additional System Requirements
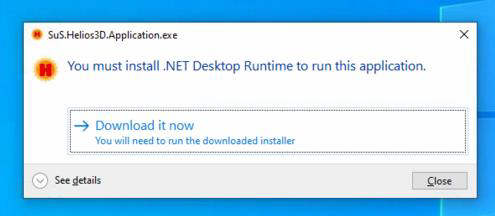
This version requires a new .NET Desktop Runtime which might need to be installed the first time you try to start Helios 3D. If Civil 3D 2025 is already installed, this dialog should not appear.
The message displayed below allows to download the required installation file, which need to be manually installed without taking user decisions.
Important Note on Compatibility
DWGs saved with Helios 3D 2025 can no longer be opened in Helios 3D 2024 or earlier!
Before opening productive DWG files with a newer Helios 3D version, create a backup copy of the project and drawing data. This is especially important when the same project may still need to be opened with an older Helios 3D version.
Do not overwrite productive project drawings during compatibility testing. Use a copy to verify that the drawing, project data and connected database information behave as expected in the newer version.
You can use any supported Civil 3D version and switch between them.
We recommend creating a copy of old DWG files and working on the copy, so in the worst case the existing design still works in former product versions.
Installation Medium
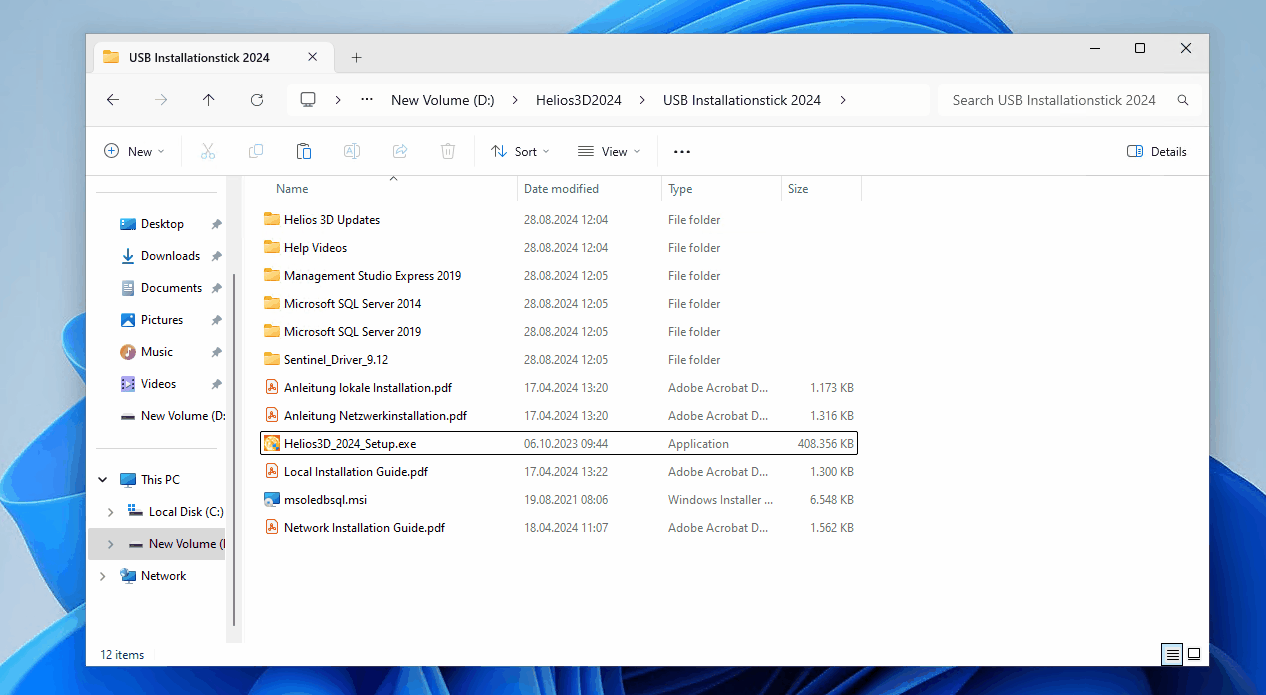
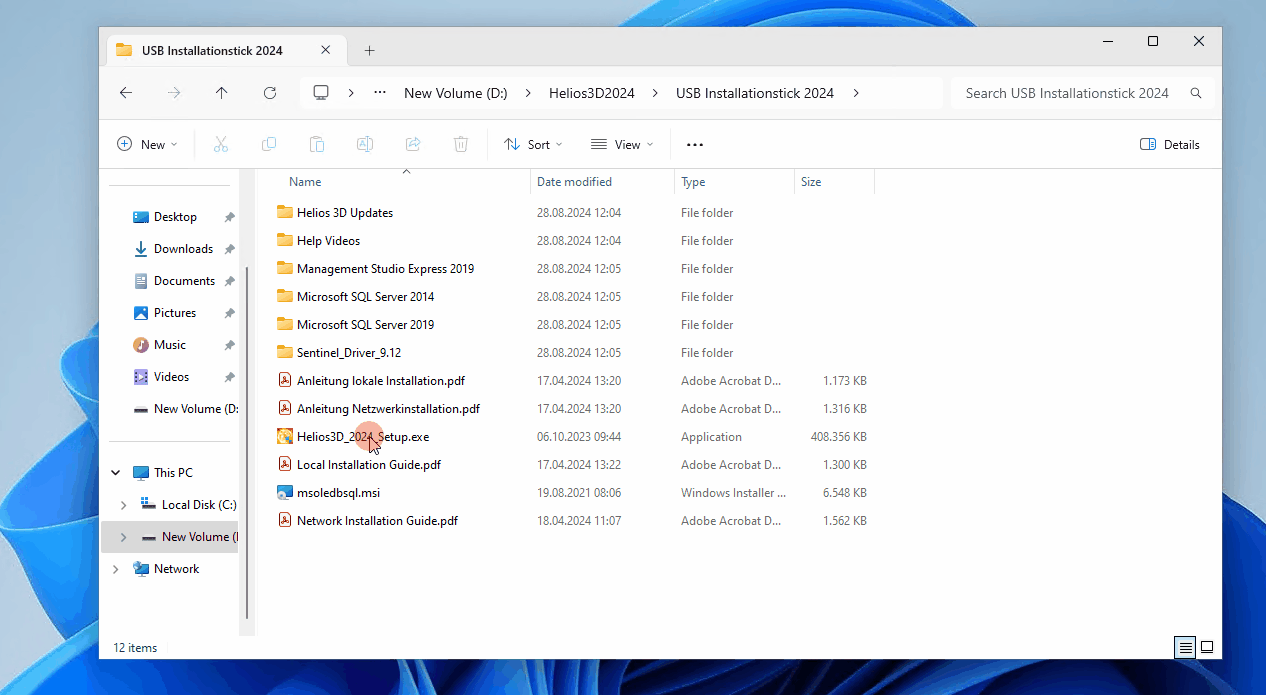
When purchasing Helios 3D, a storage device (USB stick) with all essential installation packages and data will be provided.
Download links include minimal packages for each specific installation.
Installation Stick (USB)
The stick contains:
- Helios3D_2025_Setup.exe, which starts the Helios 3D installation
- msoledb.msi, in case of login issues with the SQL server during installation
- Installation guides in PDF format (German and English)
- Subdirectories:
- Microsoft SQL Server Express installation packages for manual setup
- SQL Server Management Studio
- Sentinel driver package (for licensing issues)
- Updates (if the installation medium is not up-to-date)
- Folder with tutorial videos
Choose a local installation if Helios 3D will mainly be used on one workstation with its own local program and project environment. Choose a network installation if several users or workstations need to share the same Helios 3D program data, project data, libraries or database.
If you are unsure which installation type is required, clarify this with the responsible administrator before starting the setup.
Local
The installation of Helios 3D can be started by the Helios3D_2025_Setup.exe on the Helios 3D-flash drive. We strongly recommend installing Autodesk Civil 3D in advance, so the configuration steps described under “First steps” are done automatically in most cases!
For a local installation, prepare the following information before starting the setup:
- Installation path for Helios 3D.
- SQL Server name or instance name.
- SQL Server login credentials.
- Information whether an existing Helios 3D installation should be updated or whether an additional version should be installed.
- Access to the installation medium or download package.
During the installation process, the login data for the preinstalled Microsoft SQL Server (Express) are required. We recommend keeping the login data for the user ‘sa’ available, as this ensures full access.
For assistance installing an SQL Server, we have a separate document.
Firewalls and antivirus software might prevent the setup from copying data!
Backup all important data!!!
The backup should include existing Helios 3D project data, drawing files, database-related information and any customized library or block data that may be affected by the installation or update.
If the installation is an update of an existing Helios 3D version, do not continue until you know where the existing project and database data are stored.
Insert the Helios installation flash drive. Start the Helios3D_2025_Setup.exe from the main directory.
After selecting the program language and accepting the license agreement, the following dialogs for basic decisions get displayed.
Selecting a Product
Only if there is already a Helios 3D installation on your computer, you will see the following dialog after starting the Helios3D_2025_Setup.exe:

Here you can choose to install an additional version of Helios 3D or select one of the installed versions for update.
The following dialogs offer you to select a language for the current installation and to accept the license agreement. Please, read the license agreement thoroughly before you accept them. Please be aware of that the installation will only continue if you accept the license agreement.
Selecting a path
Afterwards you can select a path for your installation.
The default path “C:\Helios3D” was chosen on purpose for a local installation, because otherwise there were problems with the user rights. Helios needs write access for its program base path.
It is NOT recommended using the path “C:\Program Files\”, as the Windows user needs write access to several subdirectories. If you still use that path, Helios 3D must be run with the option “Run as administrator”.
When selecting the installation path, avoid directories where normal Windows users do not have write access. Helios 3D needs write access to several program and data subdirectories.
For local installations, make sure that the selected drive has enough free space not only for the program installation but also for future project data, drawings, libraries and exported files.
When selecting the installation path, keep in mind that this path will also include the project data. Therefore, you should choose an installation path on a drive that has sufficient space for your future work with Helios 3D.
Selecting the features
If there still is no Helios 3D installation on your system, you will directly reach this dialog after starting the Helios3D_2025_Setup.exe:
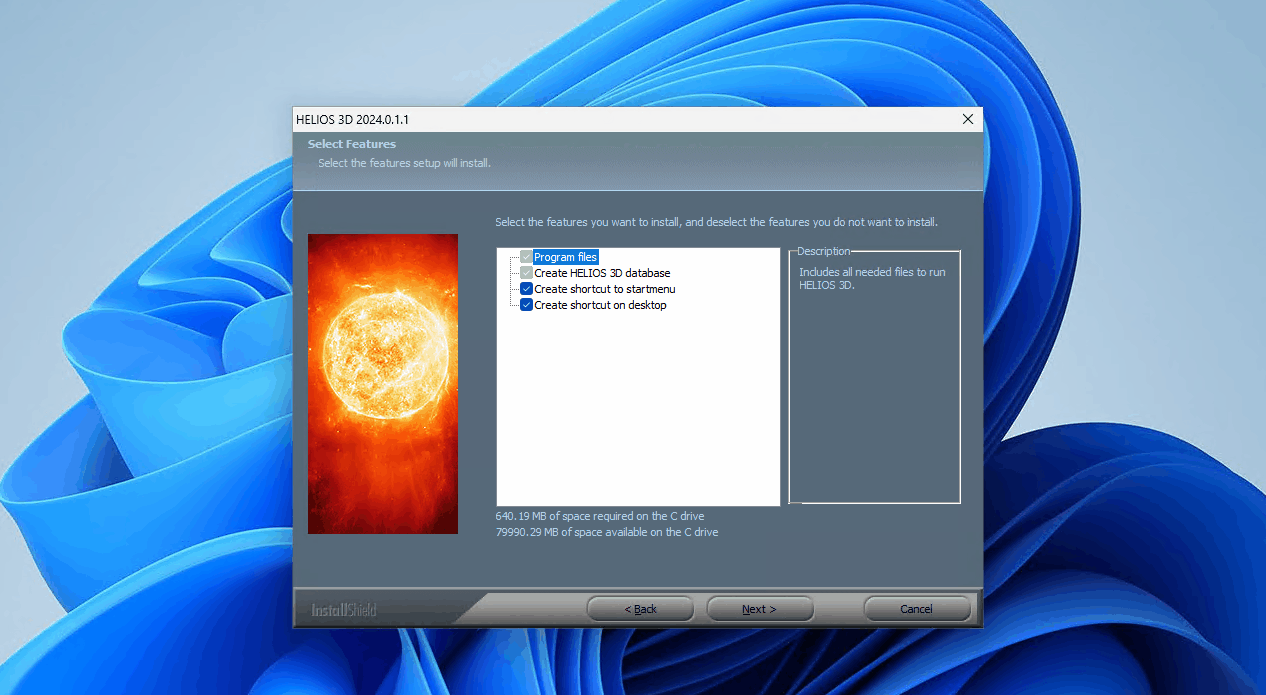
Here you can select if a shortcut with Helios 3D should be created to start menu or/and on desktop.
In the next step, Install Shield checks some pre-conditions for the installation of Helios 3D and installs the SafeNet driver, when needed.
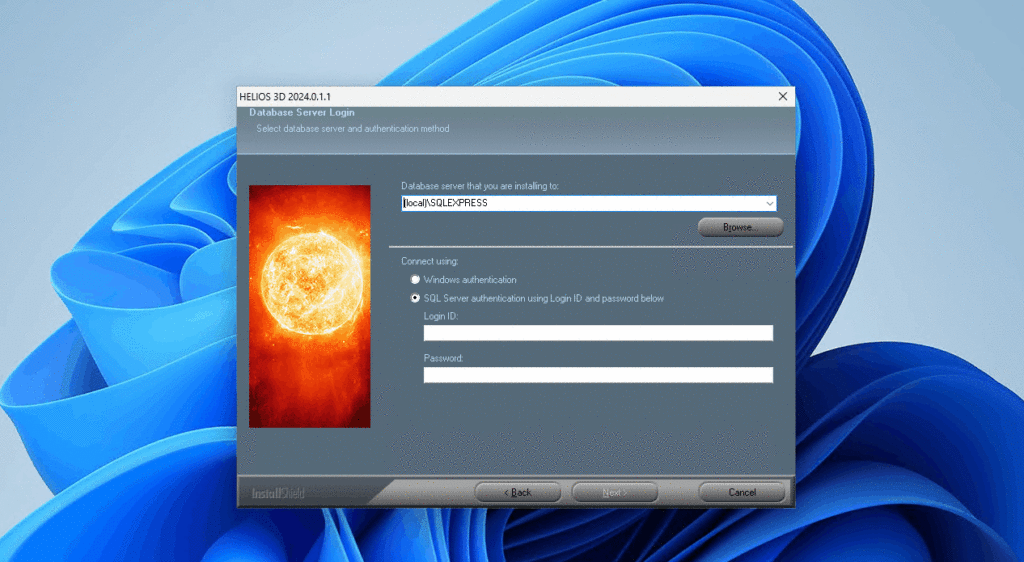
SQL Server Login
Please enter the login data for the SQL Server in the next dialog.

Typing the server name can be much faster than searching the network with <Browse…>.
If the SQL Server is not listed or cannot be reached, check the server name, instance name, SQL Server services, network connection and firewall configuration before continuing.
For network installations, the server must be reachable from the client or installation workstation using the same SQL Server name that will later be used by Helios 3D users.
Create Database
You can now accept the default database name “Helios3D” or enter a new unique name.
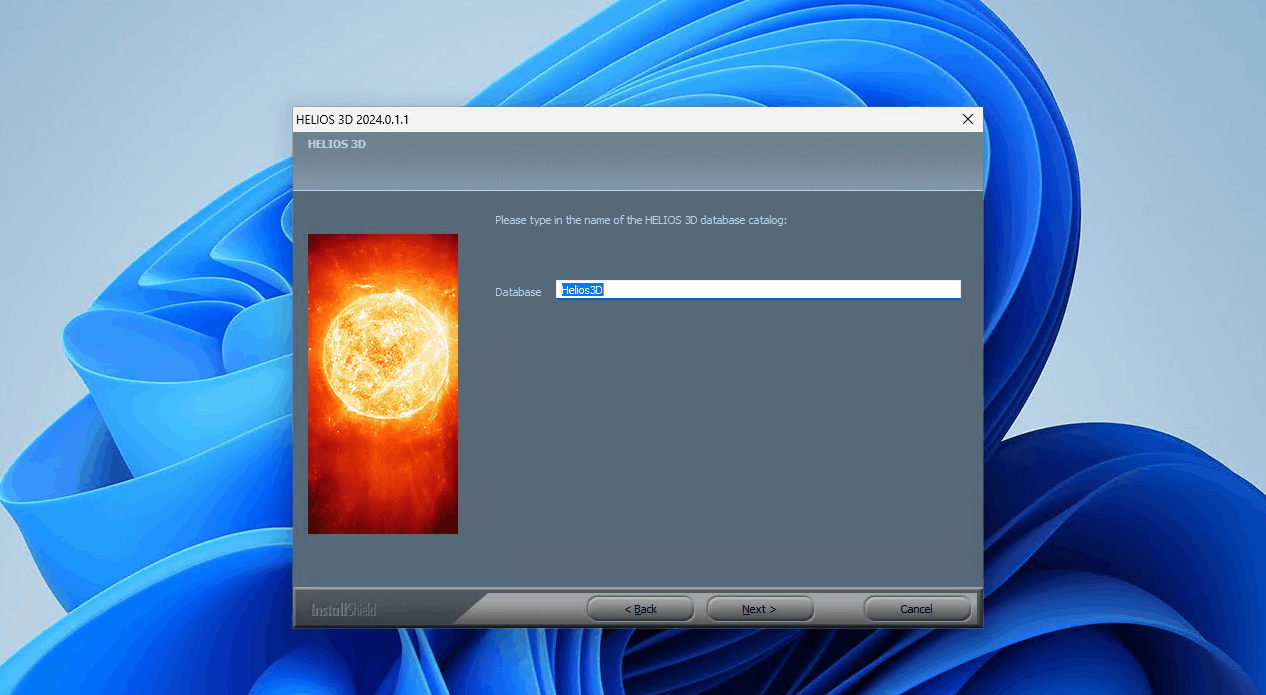
The installation will go on with <Next >, when the database name is valid.
If database script errors occur on this step, please restart Windows. After the restart, check whether the SQL Server is running properly before you run the Helios 3D setup to the already running SQL Server.
If the script “CREATE DATABASE” fails, you can also create the database catalogue “Helios3D” manually and use it in this dialogue. For that you need SQL Server Management Studio.
Use a unique database name for each independent Helios 3D installation. Do not reuse an existing database name unless you intentionally want to connect to an existing Helios 3D database and you are sure that it matches the installed program version.
If database creation fails, document the exact error message before retrying. This information is important for support and for checking SQL Server permissions, collation, service status and database access.

Network
Preliminary Remarks
Before starting the installation, you need to choose an installation type.
One simple option is to perform a local installation on a server and then share the database and necessary program paths via drive letters. The program paths are set centrally for all Helios clients, allowing all clients to access program components via the same path. This setup would result in a shared server for both the database and the program, and you would need to enable network access protocols for the SQL Server afterwards.
A SQL Server must always be installed in advance before you begin the Helios 3D installation, as it is necessary to add a database. Both the SQL Server and the program installation must be performed on servers or systems that are fully shared on the network. Mixed installations with a central SQL Server and local copies of the program files on different workstations can cause issues, as a 1:1 relationship between the database and program data is required.
For network installations, define the server architecture before running the Helios 3D setup. Decide where the SQL Server, Helios 3D program files, project data, library data and block data will be stored.
All clients must access the shared Helios 3D installation and related paths consistently. Different local program copies connected to the same shared database must be avoided because they can cause update, version and data consistency problems.
System Architecture Overview
The following overview illustrates all connections between the program components, including the update FTP server at Stöhr + Sauer.
The server side depicted on the right can be consolidated into a single server or distributed across 3 servers, and potentially 4 servers if the program and data components are separated. The used ports are also shown.
Use the architecture overview to check which systems must communicate with each other. In restricted company networks, verify the required ports, server names, drive mappings and firewall rules together with the IT department before the first client is connected.
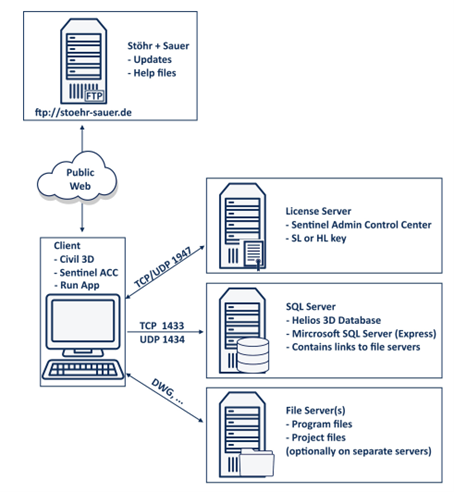
The connection to the FTP server is not required for operation. However, software updates and documentation can only be provided upon request via a NextCloud link if the connection is not available.
Configuring SQL Server Access from the Network
To enable clients from a connected network to access the server, additional configuration steps are required on the installed SQL Server.
- Open the Computer Management console, navigate to “Services and Applications”, and then open “SQL Server Configuration Manager”. By selecting „SQL Server Services“, you will see all local SQL Server instances. The default instance for Helios 3D is named “SQLEXPRESS” or “SQLHELIOS3D” (if the former was already in use during installation).
- Ensure that the start mode for both the SQL Server and SQL Server Browser services is set to “Automatic” and that both services are running. If the “SQL Server Browser” service does not start, you can start it through Windows Services and then check the start mode.
- Under “SQL Server Network Configuration”, „Protocols for SQLEXPRESS“ ensure that Shared Memory, TCP/IP, and Named Pipes are enabled to allow network access to the server. After enabling these protocols, restart both the SQL Server and SQL Server Browser services from step 2.
- The following firewall exceptions are required:
a. For the SQL Server:- Protocol: TCP Port: 1433
- Protocol: UDP Port: 1434
You can also define a firewall exception for sqlservr.exe. The correct path can be verified in Windows Services by checking the properties of the service „SQL Server (SQLEXPRESS)“.
After changing SQL Server protocols or firewall settings, test the connection from a client workstation before continuing with the Helios 3D client setup.
If the SQL Server cannot be reached from a client, check the SQL Server service, SQL Server Browser service, instance name, enabled protocols, firewall rules and network name resolution.
Helios 3D installation
The installation of Helios 3D can be started by the Helios3D_2025_Setup.exe on the Helios 3D-flash drive. You can start the local installation on the server or from a client and put all files to a server. The second method requires administrator rights for all related systems.
Firewalls or antivirus software might disturb the setup execution or copy processes on the network!
It is never allowed to do multiple local installations and access a shared database, as this will cause trouble managing updates and sharing data!
For network installations, this procedure should not be done to a local workstation! Instead, all Helios 3D clients will access this installation, which must get shared by a network drive mapping, like “H:\Helios3D“.
The drive mapping or path must be identical for all clients. If one workstation accesses the installation as “H:\Helios3D” and another workstation uses a different drive letter or path, configuration and file access problems may occur.
After sharing the installation, start Helios 3D from at least one client and verify that the program starts, the database login works and the configured paths in System Settings point to the intended shared locations.
It is never allowed to do multiple local installations and access a shared database, as this will cause trouble managing updates and sharing data!
Backup all important data!!!
Insert the Helios installation flash drive. Start the Helios3D_2025_Setup.exe from the main directory.

After selecting the program language and accepting the license agreement, the following dialogs for basic decisions get displayed.
Selecting a product
Only if there is already a Helios 3D installation on your computer, you will see the following dialog after starting the Helios3D_2025_Setup.exe:
Here you can choose to install an additional version of Helios 3D or select one of the installed versions for update.
The following dialogs offer you to select a language for the current installation and to accept the license agreement. Please read the license agreement thoroughly before you accept them. Please be aware of that the installation will only continue if you accept the license agreement.
Selecting a path
Afterwards you can select a path for your installation.

The default path “C:\Helios3D” was chosen on purpose for a local installation, because otherwise there were problems with the user rights. Helios needs write access for its program base path.
It is NOT recommended using the path “C:\Program Files\”, as the Windows user needs write access to several subdirectories. If you still use that path, Helios 3D must be run with the option “Run as administrator”.
Selecting the features
If there still is no Helios 3D installation on your system, you will directly reach this dialog after starting the Helios3D_2025_Setup.exe:

Here you can select if a shortcut with Helios 3D should be created to start menu or/and on desktop.
In the next step, Install Shield checks some pre-conditions for the installation of Helios 3D and installs the SafeNet driver, when needed.
SQL Server Login
Please enter the login data for the SQL Server in the next dialog.
Typing the server’s name can be much faster than searching the network with <Browse…>.
Create Database
You can now accept the default database name “Helios3D” or enter a new unique name.

The installation will go on with <Next >, when the database name is valid.
If database script errors occur on this step, please restart Windows. After the restart, check whether the SQL Server is running properly before you run the Helios 3D setup to the already running SQL Server.
If the “CREATE DATABASE” script fails, you can also manually create the database catalogue “Helios3D” and during this step confirm that the existing database should be used. You can do so with SQL Server Management Studio.

Sharing the Helios 3D installation
For sharing the installation, the main installation folder “Helios3D” must be accessible the same way from any client e.g., with the same drive letter. That means the folder which contains the directories “Bin”, “Bitmaps”, “CAD”, etc.
Example: “H:\Helios3D”
In case the project and/or article related data should be put to an individual location, the subfolders “Projects” and “Library” can be copied.
When Helios 3D gets started for the first time, the mentioned paths need being adjusted in the system settings. This step can be done on the server, if that has the drive mapping, or from the first client. As license dongles get shipped with a short time pre-activation, this can be done even before the final activation is provides by STÖHR+SAUER GmbH.
The path settings can be found under “System settings”.
Add a new client
To avoid additional steps from the section “First steps”, we recommend installing Autodesk Civil 3D before adding a client to the Helios 3D installation.
A client just requires the Sentinel driver for licensing being installed and a desktop link to the application. The easiest way getting started, would be running the setup.exe from the folder “Client Setup” inside the main directory “Helios3D”.
For just installing the Sentinel driver without running the client setup, you can run the Install.bat from the directory “.\Client Setup\Hardlock”.
After adding a client, verify the following points on the workstation:
- Autodesk Civil 3D is installed and starts correctly.
- The Helios 3D desktop link points to the shared installation.
- The Sentinel driver is installed.
- The SQL Server login works.
- The configured Helios 3D paths are reachable from the client.
- A test project or test drawing can be opened.
First Steps
First Login
Start Helios 3D by clicking the corresponding button on the desktop. In the subsequent dialog, enter the login credentials for SQL Server authentication that you assigned during the SQL Server installation.

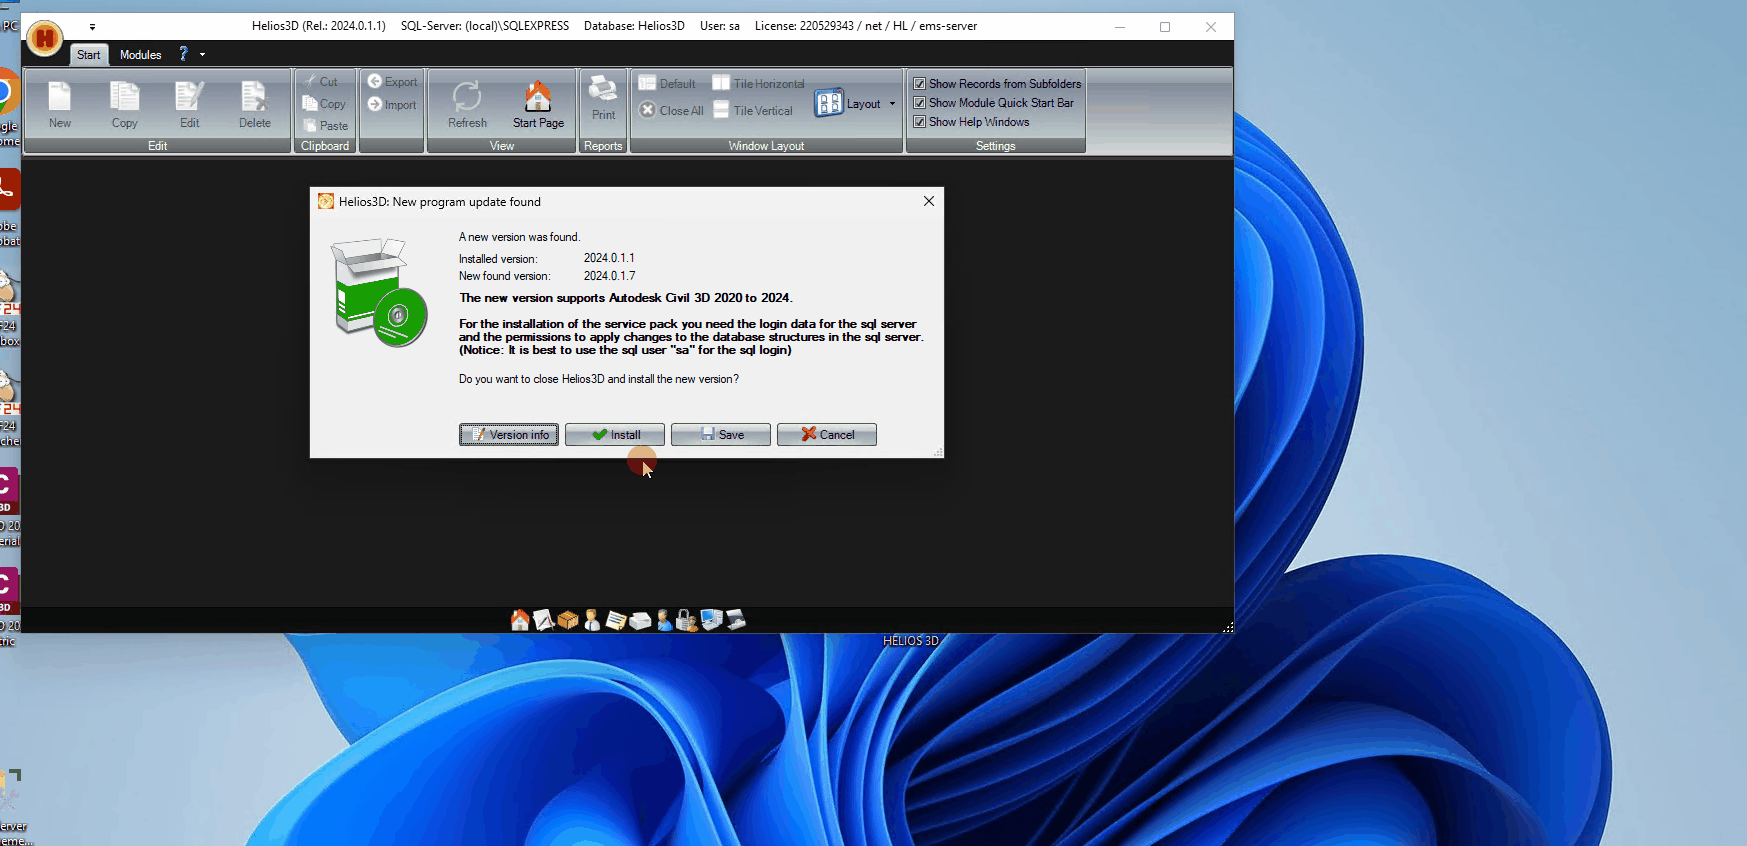
During the program startup, Helios 3D checks for available updates and displays them. You can then decide whether to install the update immediately or save it for later installation.
After the first successful login, check whether Helios 3D connects to the expected database and whether the available updates match the intended installation version.
In network installations, coordinate updates with the administrator before installing them, because all clients should use a consistent Helios 3D program version.
Configuration Helios 3D
First Helios 3D needs a default configuration. For this purpose, open the module “Workstation configuration” in your Helios 3D application. You can find it in the program tab “Modules” by the button “Workstation”
Select the station you want to edit in the list and then go to the window “Additional data” (below the list of stations) and to the tab “Program configuration”.
In this list there must be at least a standard configuration which connects Helios 3D to a CAD application. For adding this one or an additional configuration, right-click into the list and select the function “New…” in the context menu. In the opening dialog you can add a new configuration as the following video shows by the example of Autodesk Civil 3D.
Here you have to enter a name the parameters for configuration:
- Type (Select a program type from the list)
- Program (Program path of the execute file of the program)
- Profile (Name of the profile from the selected program. This profile will automatically be get loaded on program start-up. Remarks for setting up a profile will follow in the next section.)
The workstation configuration is required so that Helios 3D knows which CAD application and profile should be used when starting the CAD environment.
If Helios 3D does not start the expected Civil 3D version or profile, check the configured program path, selected program type, profile name and default CAD configuration.
If you enable the “Default CAD configuration” option (optionally), the current configuration will be preselected on start-up of Helios 3D. If no program configuration is set as default, the first one in the list (sorted by name) will be preselected.
The call command and the command line call will automatically be shown and cannot be edited.
Autodesk Civil 3D Example Installation
To install Autodesk Civil 3D, you need an Autodesk account. Use this account to log in at https://accounts.autodesk.com/logon. You can then select and install the appropriate version of Autodesk Civil 3D as described in the following video.
If you do not have an Autodesk account, please ask the administrator responsible for CAD products in your company to create an account for you and assign Autodesk Civil 3D to you.
If your company does not yet have a valid license for Autodesk Civil 3D, you can create an Autodesk account yourself and then download and install a demo version of Autodesk Civil 3D. This demo version is valid for 30 days.
Currently, Helios 3D supports Autodesk Civil 3D versions 2021 through 2026.
To ensure that Autodesk Civil 3D remains up to date and any program errors are resolved, you should always install the latest updates from Autodesk. These updates are automatically retrieved through the Autodesk Access application.
The following video demonstrates how to install updates for Autodesk Civil 3D.
SQL-Server Example Procedure
This document just gives a short overview about the recent steps of a manual SQL Server Express installation. Please check the Microsoft pages for more detailed descriptions, if you want to do an advanced installation.
In company networks, SQL Server installation and configuration should be performed or approved by the internal IT department. SQL Server permissions, firewall rules, service accounts, password policies and network security settings can differ between companies and may affect the Helios 3D installation.
Please regard that, especially in a company network environment, there are various security issues that can occur during or after the installation, which can cause problems running the SQL Server instance or connecting to it from a user workstation. Therefore, installations on a company server can only be performed by the in-house IT team, as detailed and confidential knowledge about the network is required.
During setup, there will be a warning if a running firewall is detected, because it might cause problems during installation. That depends a lot on the firewall configuration, so please discuss with your IT department how to proceed with this.
- For starting the installation, use the option “Run as administrator” for the setup file.
- Start a new SQL Server installation.
- Next dialog: Accept license terms and hit <Next>.
- Next dialog: If you enable the update check, the installation takes more time, as update packages get downloaded.
- Next dialog: The installer recommends to disable firewalls for the installation process and shows a warning if a running firewall is detected.
- If you continue with a running firewall, that might be a reason for problems during installation.
- Next dialog: The option “Azure Extension for SQL Server” is required to enable security features related to the SQL Server. This only works if you have a Microsoft 365 account. Otherwise, deselect this option.
- Next dialog: Only change the feature selection if required.
- Next dialog: Choose a name for the SQL Server instance. That name is required in the Helios 3D login dialog. The default name would be SQLExpress. If that name is already used, our alternative would be SQLHELIOS3D.
The defaults most likely are different for any other country!
- The default collations have apparently changed in Microsoft SQL Server Express 2017, so if the default list doesn’t contain the required collation, please choose “Windows collation designator and sort order” and set the correct collation.
If you want to ensure the compatibility with other SQL Servers, please check their collation setting and configure it likewise.
After saving the collation by hitting <OK>, you will see the final name.
Compare that name carefully with the collation name you need to set, as any difference might cause serious compatibility issues.
- Next dialog: “Server Configuration”
This step contains the “Collation” settings on the 2nd tab. The collation should be exactly matching the setting of other SQL Servers in your company that might be related to Helios 3D, e.g. additional Helios installations with independent SQL Server instances. Moving a database between servers for example requires the collation to match! - Next dialog: In the “Database Engine Configuration” enable the “Mixed Mode”, so the ‘sa’ account gets enabled for administration. The local Helios 3D installation procedure uses the password “Helios-3D!” for the ‘sa’ user. If your password policy is stricter than that, you might need a longer password (e.g. just double it).
Please note down the set password, as there is no way for us to assist you with SQL Server related problems, if the password is lost!
- Next dialog: The installation should complete without errors.
After installing the SQL Server, you must ensure that the required services are running and the protocols are correctly configured.
To do this, go to “Computer Management” and check if the “SQL Server” service is running and set to “Automatic”. The “SQL Server Browser” service is only required if the SQL Server is to be accessible over the network.
Next, ensure the protocols for the SQL Server are set to „Enabled”.
The necessary steps are described in the following video.
After this procedure, the SQL Server should run properly and the Helios 3D login dialog should find it, when the user refreshes the selection boxes. As we point out at the beginning of this document, especially user rights and other security related rules can cause connection problems in a network environment.
The network ports 1433 (TCP) and 1434 (UDP) are essential for reaching a network server and must not get blocked by any firewall. If there are different firewalls used in the network and on a local machine, both firewalls might be configured!
If clients cannot find or connect to the SQL Server, test the connection from the client machine and check whether local and network firewalls allow the required communication. In environments with multiple firewall layers, both the server firewall and the client or network firewall may need to be configured.
In some situations, it is necessary to work on the Helios 3D SQL database. This can only be done using the “SQL Server Management Studio“.
The following steps describe how to install the “SQL Server Management Studio“ (SSMS):
- Download the installation file from the official Microsoft website.
- Run the installer and follow the on-screen instructions.
- During installation, select the default options unless specific configurations are required.
- Once the installation is complete, launch SSMS and connect to your SQL Server instance using the appropriate login credentials.
After installation, you can use SSMS to manage and work with the Helios 3D SQL database.
One use of SQL Server Management Studio is, for example, retrieving the collation of an installed Helios 3D database.
Sentinel Driver (Manual installation for licensing)
It may happen that the Sentinel driver is not installed during the Helios 3D installation, resulting in the page http://localhost:1947 being inaccessible. Every Helios 3D installation includes the driver package in the subdirectory .\Client Setup\Hardlock. For a local installation, the default directory is C:\Helios3D\Client Setup\Hardlock. The Install.bat file located there simply calls haspdinst.exe with the -i parameter.
You can also manually execute these steps from a command prompt (cmd) with administrator rights. The standard command shown below should end with a success message. Only then the installation is considered successful.
Reasons for installation errors can include insufficient permissions and security systems that prevent execution. If the files are not located on the local C drive, you can copy them there and try running the installation again.
If the Sentinel driver installation fails, run the installation with administrator rights and, if necessary, copy the driver package to a local drive before executing it.
After installation, verify that the local Sentinel Admin Control Center is reachable. If it is not reachable, the driver installation, permissions or security software should be checked.
License Server
Setting up a License Server
This document describes the setup of a new license server with SL keys, which are virtual licenses for Helios 3D. To generate an activation file, a fingerprint of the physical or virtual server must be created and sent to STÖHR+SAUER GmbH. The server cannot be changed later without the assistance of STÖHR+SAUER GmbH.
Select the Server:
- Choose the physical or virtual server that will act as the license server.
Install the Sentinel Driver:
- Run the Install.bat from the driver package provided with the software.
- The files are located in the folder Sentinel_Driver_9.12 on the installation USB stick.
At the end of the installation, a success message should appear after running the command-line process.
If the success message does not appear, the installation may need to be run from a local drive or you might require administrative rights.
After a successful installation, the following page should be accessible:
http://localhost:1947/int/devices.html
If a client does not detect the license server, check whether the Sentinel driver is installed on the client, whether the license server is reachable in the network and whether TCP and UDP port 1947 are allowed by all relevant firewalls.
For license server problems, document the client name, server name, Sentinel driver status and the exact error message before contacting support.
With the driver installed, you can run SuSRUS.exe from the installation package.
Generating a License Request
To generate a license request, follow these steps:
- Run SuSRUS.exe from the installation package.
- On the first page, select “Installation of new protection key and click “Collect Information“.
- Save the generated
.c2vfile (e.g., to your desktop). - Send the
.c2vfile to helios3d@stoehr-sauer.de to request the activation of your Helios 3D license.
Additionally, we need information on whether a physical or purely virtual server will be used!
You will receive a .v2c file that can only be added to the server from which the fingerprint was generated. Applying the file, as well as future changes to license information, can be done either on the second page of the SuSRUS.exe tool or through the Sentinel Driver via a browser at:
http://localhost:1947/int/checkin.html
The process of applying the file via the driver works as shown in the following video.
In many cases, the licenses are recognized automatically. Otherwise, ensure that TCP and UDP port 1947 are not being blocked.
http://localhost:1947/int/config_to.html
On the client side, you can improve license detection with the following settings. After clicking <Submit>, it may take up to one or two minutes, but the licenses should be found afterward.
For further assistance, please contact helios3d@stoehr-sauer.de.
Installation validation checklist
After completing the installation, verify the following points:
- Helios 3D starts without errors.
- The SQL Server login works.
- The correct Helios 3D database is used.
- Autodesk Civil 3D is installed and can be started from Helios 3D.
- The workstation configuration contains at least one valid CAD configuration.
- Project, library and block paths are reachable.
- Required users have sufficient write permissions.
- The Sentinel driver is installed.
- The license or license server is detected.
- A test project and test drawing can be created or opened.
Troubleshooting
If Helios 3D does not start or cannot connect to the database, check the SQL Server name, instance name, SQL Server services, login credentials and firewall configuration.
If the installation cannot copy files, check antivirus software, firewall settings, Windows permissions and whether the setup was started with sufficient rights.
If users cannot access a network installation, verify that all clients use the same shared Helios 3D path and that the SQL Server is reachable from each workstation.
If Autodesk Civil 3D does not start from Helios 3D, check the workstation configuration, program path, selected program type and profile name.
If licenses are not detected, check the Sentinel driver, the license server connection and TCP/UDP port 1947.
Related topics
- Maintenance
- Licensing
- Workstations
- System Settings
- Fixing Helios 3D Loading Issues in Civil 3D
- What does the message “This drawing was last saved by an earlier version of one of the following products:” mean?
- Why does the Selection Dialog for Prototype Drawings not appear?