
Maintenance
This chapter explains the maintenance tasks that are required to keep a Helios 3D installation operational, recoverable and transferable to another workstation or server. It covers backups, restore procedures, software updates and the migration of local or network installations.
Maintenance tasks affect several parts of a Helios 3D environment: the SQL database, project folders, library folders, program files, workstation setup, AutoCAD / Civil 3D profiles and, depending on the installation type, license components. Because Helios 3D planning data is stored partly in drawings and partly in the database, a complete backup must include all relevant data locations.
These procedures are usually performed by administrators, IT staff or experienced Helios 3D users. Before changing versions, restoring databases or moving installations, make sure that all users have closed Helios 3D and that a verified backup is available.
Backup / Restore
Use this section when you need to create a safety copy of a Helios 3D environment, prepare an update, recover from an update problem or restore an older working state.
A backup should not only contain the SQL database. It should also include all project and library folders that are configured in the Helios 3D system settings. Otherwise, restored database entries may reference drawings, component libraries or project data that are missing on the file system.
Important: A database backup alone is not a complete Helios 3D backup. Always check the configured project and library paths in the Helios 3D system settings before copying files or restoring data.
Data Backup for Helios 3D
To minimize potential damage in case of data loss, we recommend regularly backing up your data. Additionally, all data should be backed up as a precaution before performing updates. Although we thoroughly test our updates before release, we cannot foresee all possible scenarios in unfamiliar environments.
Typical data that should be considered during a backup includes:
- the Helios 3D SQL database,
- the project folder containing project-related drawings and files,
- the library folder containing reusable data and templates,
- the Helios 3D installation folder, if a complete environment copy is required,
- any external storage location that is configured in the Helios 3D system settings.
Before starting an update or migration, document the current database name, server name and configured base paths. This makes it easier to reconnect the copied or restored installation to the correct data sources.
A complete data backup for Helios 3D involves backing up both the database and parts of the program installation. This is necessary because the planning data is partially stored in the drawings and partially in the database.
We recommend the following procedure:
- Create at least one copy of your project and library folders, whose paths you have configured in the Helios 3D system settings.
- Back up the database. For this, you will need SQL Server Management Studio. A detailed guide can be found on the Microsoft website. Ideally, this should be done by your IT specialist.
Warning: The backup target path for a SQL Server backup is evaluated on the SQL Server machine. A path that exists on the local workstation may not exist on the server. If the backup file cannot be created or found, check the SQL Server backup directory and the permissions of the SQL Server service account.
Starting with Helios 3D 2017, any user with full access to the SQL Server can also back up the database directly from the application.
The target path for the .bak file is located on the SQL Server, not on the client!
As part of an update, you can create a complete copy of the Helios 3D environment, ensuring that you have a functional version of the old environment in case issues arise after the update.
Follow these steps:
- Copy the entire Helios 3D installation, including the installation folder, project folder, and library folder, if applicable.
- Copy the database by creating a backup and restoring it under a new name. To do this, you will need SQL Management Studio, which can be downloaded from Microsoft.
- Launch the copied Helios 3D version and connect to the copied database during login.
- Update the paths in the Helios 3D system settings (base program path, project base path, library base path) to point to the copied directories.
For future updates, you only need to specify the correct database. The program files will automatically be accessed using the paths defined in the last step.
Restoring Helios 3D Backups
Every update from STÖHR+SAUER GmbH is thoroughly tested before release. However, issues may still arise on user systems that were not detected in our test environments. In such cases, our support team is available via email at helios3D@stoehr-sauer.de or by phone at +49 (0)2405 4137 0.
If a timely resolution is not possible, such as outside our business hours, it may be necessary to restore a backup. If the database version has changed after an update, the backup must be restored using SQL Management Studio. This step requires appropriate permissions on the SQL server and basic knowledge. We therefore recommend involving IT professionals.
You can find the current version numbers of your installation in the readme.txt file in your installation directory (e.g., „C:\Helios3D“). At the top of the document, you will find the program and database version.
The following example from update 2020.0.1.5 shows that there have been no changes to the database since version 2020.0.1.0.
======================================================================
New Version: 2020.0.1.5
DB Version: 2020.0.1.0
Status: 07.02.2020
Operating System: Windows 8, 8.1, 10
AutoCAD: Autodesk AutoCAD Civil 3D 2020 (64 Bit)
======================================================================
Before restoring a backup, compare the Helios 3D program version with the database version shown in the readme.txt. The program version must be compatible with the database version. If the database was updated and the program files are rolled back to an older version, Helios 3D may no longer be able to log in.
If you are unsure whether the database must also be restored, contact Helios 3D support or your IT administrator before replacing files or restoring the database.
Thus, the database only needs to be restored if you want to revert to a program version older than 2020.0.1.0. In this case, versions for earlier Autodesk Civil 3D releases would be affected (e.g., Helios 3D 2019.0.1.x).
The program version („New Version“) must never be lower than the „DB Version“; otherwise, logging in will not be possible!
In many cases, restoring the program files is sufficient if only the installed Helios 3D program version needs to be rolled back and the database structure has not changed. If the database version has changed, the database backup must also be restored.
Use the program file restore only after checking the version information. Do not delete the existing Bin directory immediately. Rename it first so that the current state can still be inspected or recovered if necessary.
Restoring the Program Files
In this step, only the “Bin” directory in the main installation folder is replaced. For local installations, the default directory is “C:\Helios3D”.
- Rename the current “Bin” directory so that it is not completely lost.
- Navigate to the “Backups” folder and locate the appropriate backup. Copy this backup into the main directory.
- Rename the folder “Bin_Date_Time” to “Bin”.
- Falls die Wiederherstellung der Datenbank nicht notwendig ist, können Sie Helios 3D wieder, wie gewohnt, starten und sehen die alte Programmversion.
If restoring the database is not necessary, you can start Helios 3D as usual and see the old program version.
Restoring the Database
To perform these steps, you need to log in to the SQL Server using SQL Management Studio. This program allows you to restore a backup, provided you have the appropriate permissions.
Each Helios 3D update generates a backup in the SQL Server’s backup directory. For local installations, the backup is also local, but for network SQL Servers, the displayed program path refers directly to the corresponding server!
„C:\Program Files\Microsoft SQL Server\MSSQL16.SQLEXPRESS\MSSQL\Backup“
Procedure:
- Ensure that the database catalog is not in use, meaning that Helios 3D should not be running anywhere!
- Start SQL Management Studio and log in to the SQL Server. You will need administrative rights, so we recommend using the ’sa‘ user account. You can find the server name and application database catalog in the login dialog of Helios 3D.
- Select the Helios3D database after logging in.
- Right-click on the database, then navigate to Tasks -> Restore -> Database.
- In the following dialog, select the “Device” option and open the selection dialog. Click <Add> and choose the backup. The path for the SQL Server’s backup directory is pre-selected here.
- Backup files generated by Helios 3D are named as follows:
“DatabaseName_#Version#Date#_Time.bak”
- The entry will then appear in the selection dialog, and you can confirm by clicking .
- The backup will now appear under “Backup sets to restore”, and you can proceed by clicking.
Warning: Restoring a database can overwrite existing project, component and system data. If the restored database should be used as a copy, verify the database name as well as the MDF and LDF file names before confirming the restore operation.
Make sure that no Helios 3D user is connected to the database while the restore is running. Open sessions can block the restore process or lead to inconsistent results.
If you want to restore the database under a different name, i.e., as a copy without overwriting the original, please ensure that the MDF and LDF files are correctly renamed on the “Files” page! Otherwise, parts of the original database may be overwritten.
Updates
The update function checks whether a newer Helios 3D version is available and allows you to install it immediately or save it for later installation. Before installing an update, create a backup of the Helios 3D database and the configured project and library folders.
Update 2026.0.2.0 will change the database structure which makes drawings incompatible with older Helios 3D versions. This is necessary for transforming electrical grid definitions from choice list entries into regular components / articles.
Drawings that contain the converted electrical grid definitions and are subsequently saved can no longer be edited with an older Helios 3D version that does not support the new component-based definition.
Before updating:
- create a backup of the Helios 3D database;
- create backup copies of all productive DWG files;
- back up the configured project and library folders;
- make sure that all users work with a compatible version;
- test the update and drawing conversion with copies of the productive files.
Do not overwrite the only available copy of a drawing if it may still need to be edited with an older Helios 3D version.
After the update, review the displayed information about new functions or changes. If several workstations use the same Helios 3D environment, make sure that all clients are updated or connected consistently according to your installation concept.
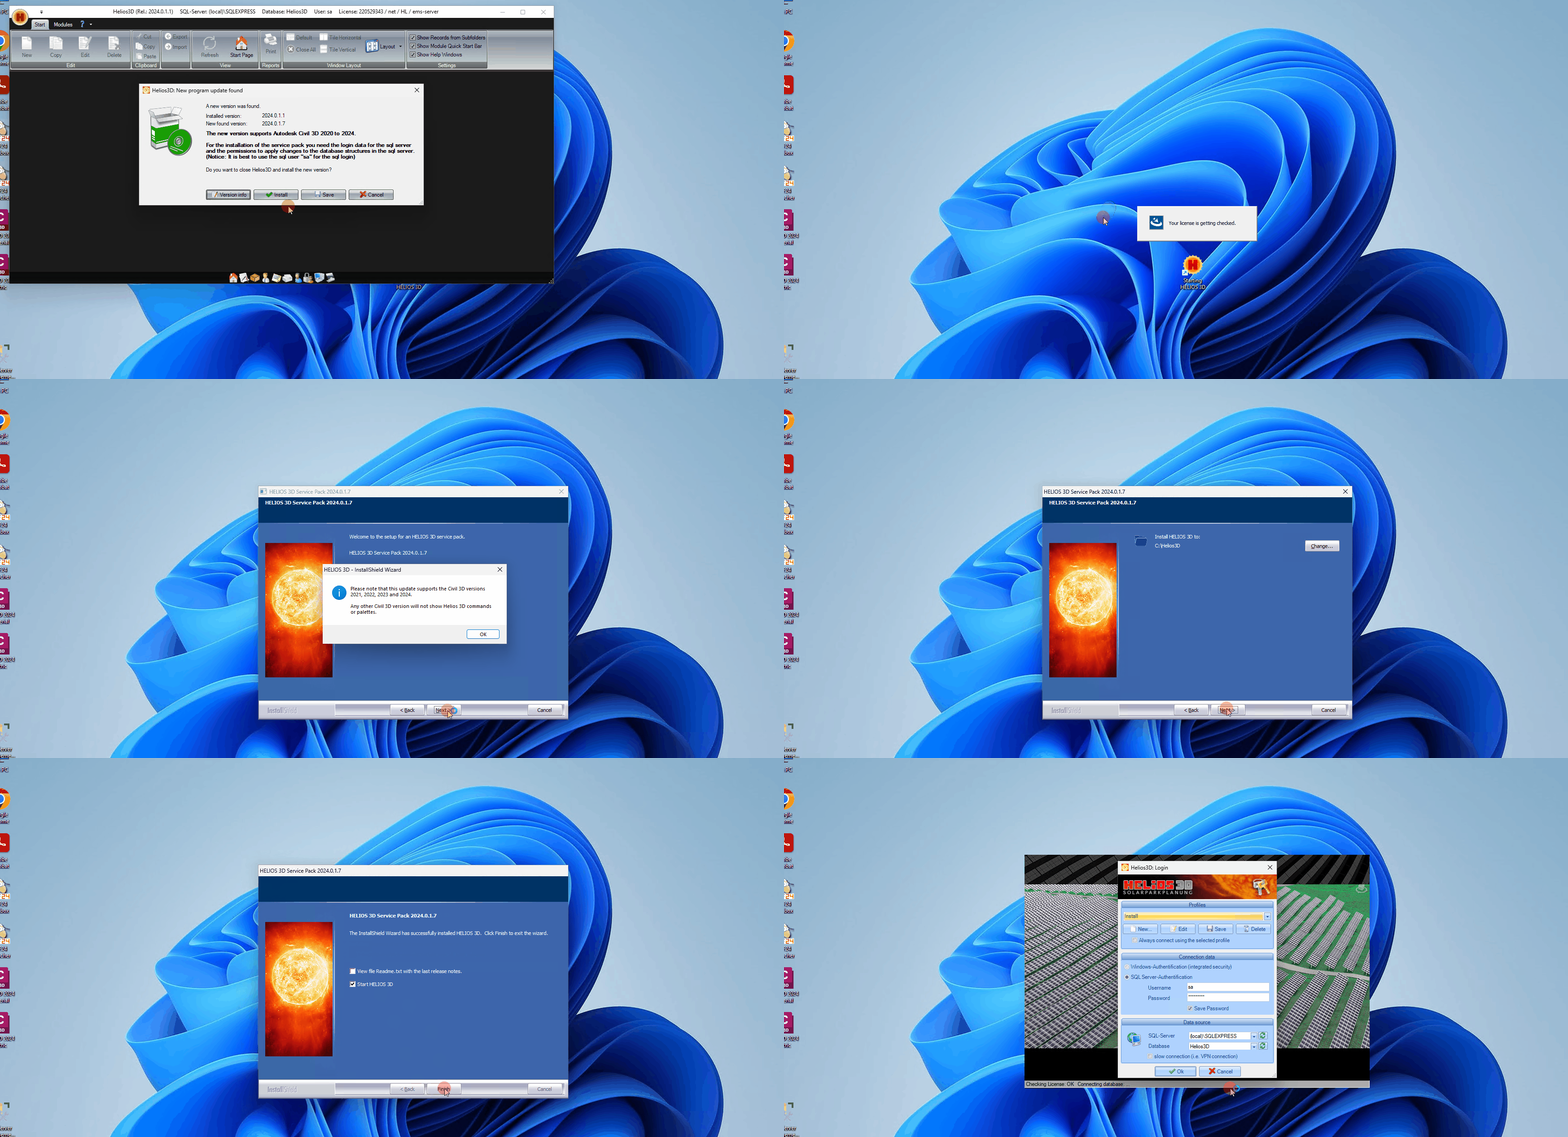
During the program startup, Helios 3D checks for available updates and displays them. You can then decide whether to install the update immediately or save it for later installation.
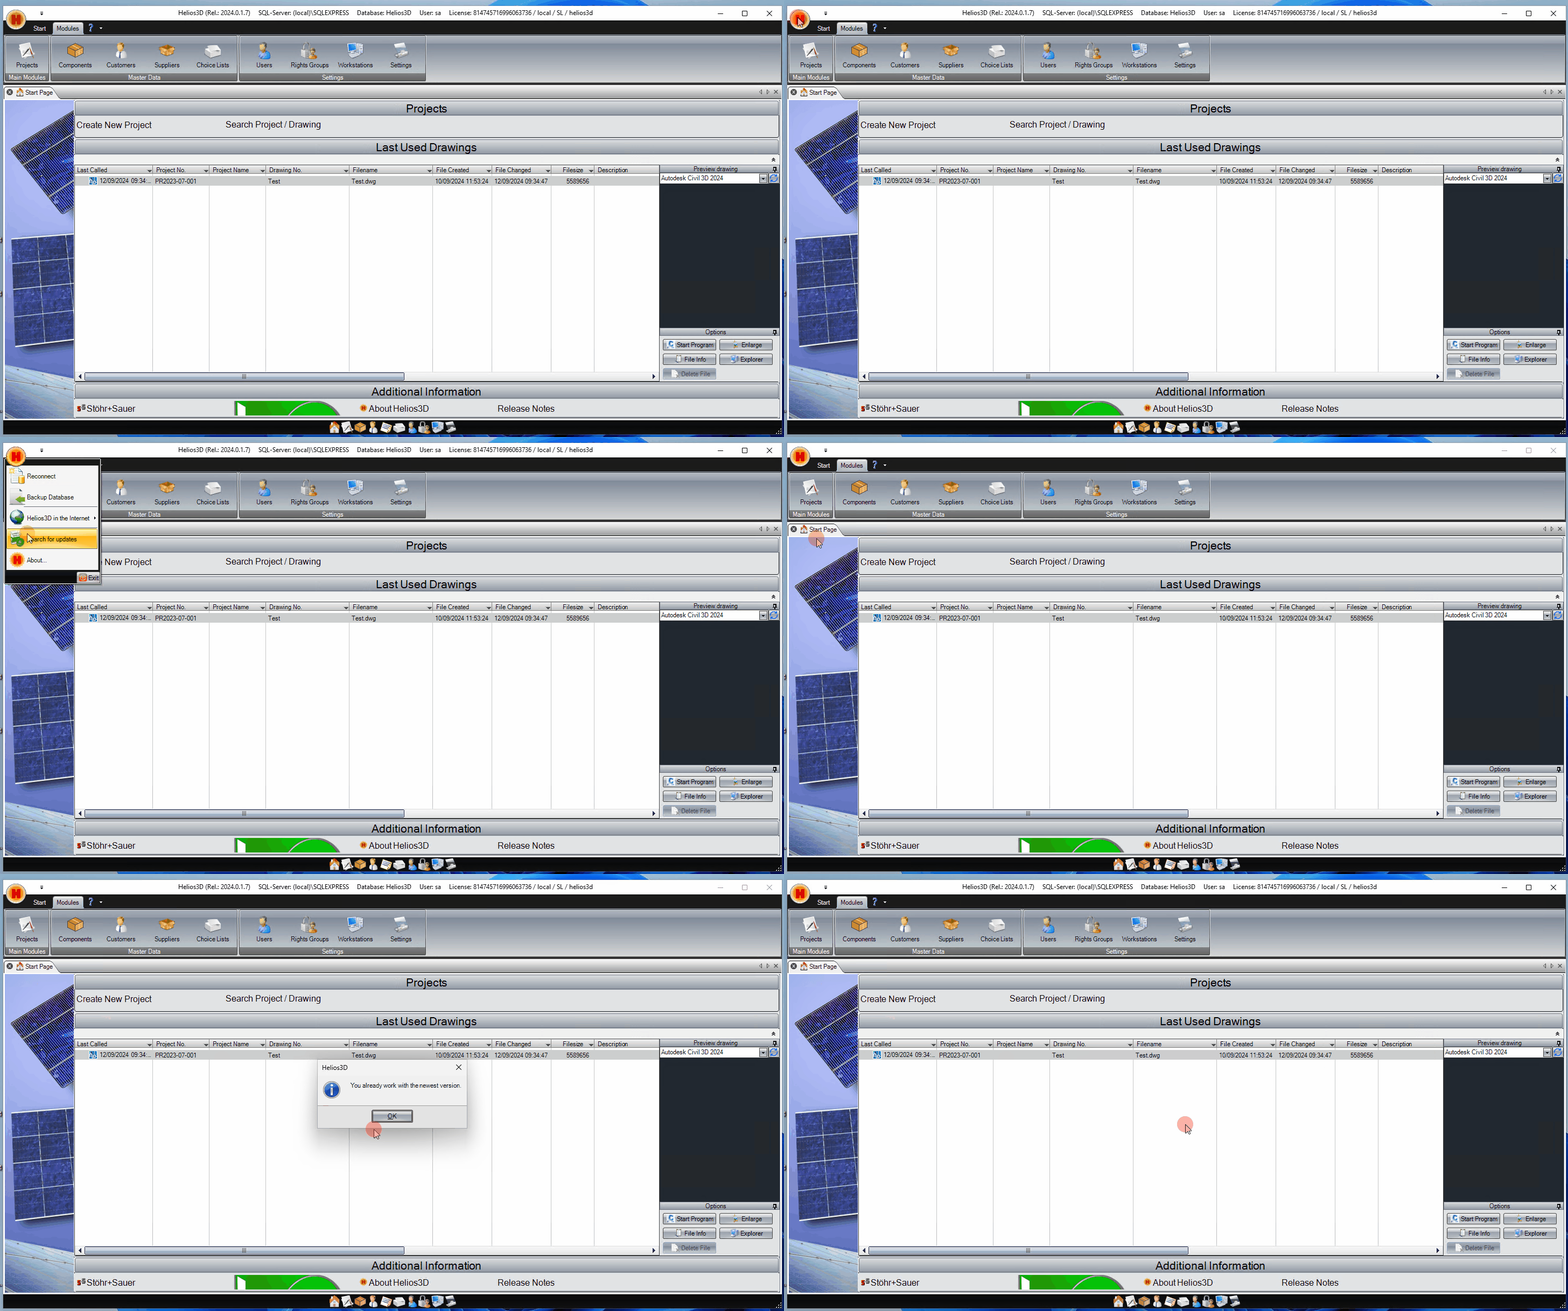
In Helios 3D, you can search for updates by clicking on the

symbol. This opens a menu that allows you to check for new software updates. Make sure you are connected to the internet to download and install the latest updates.
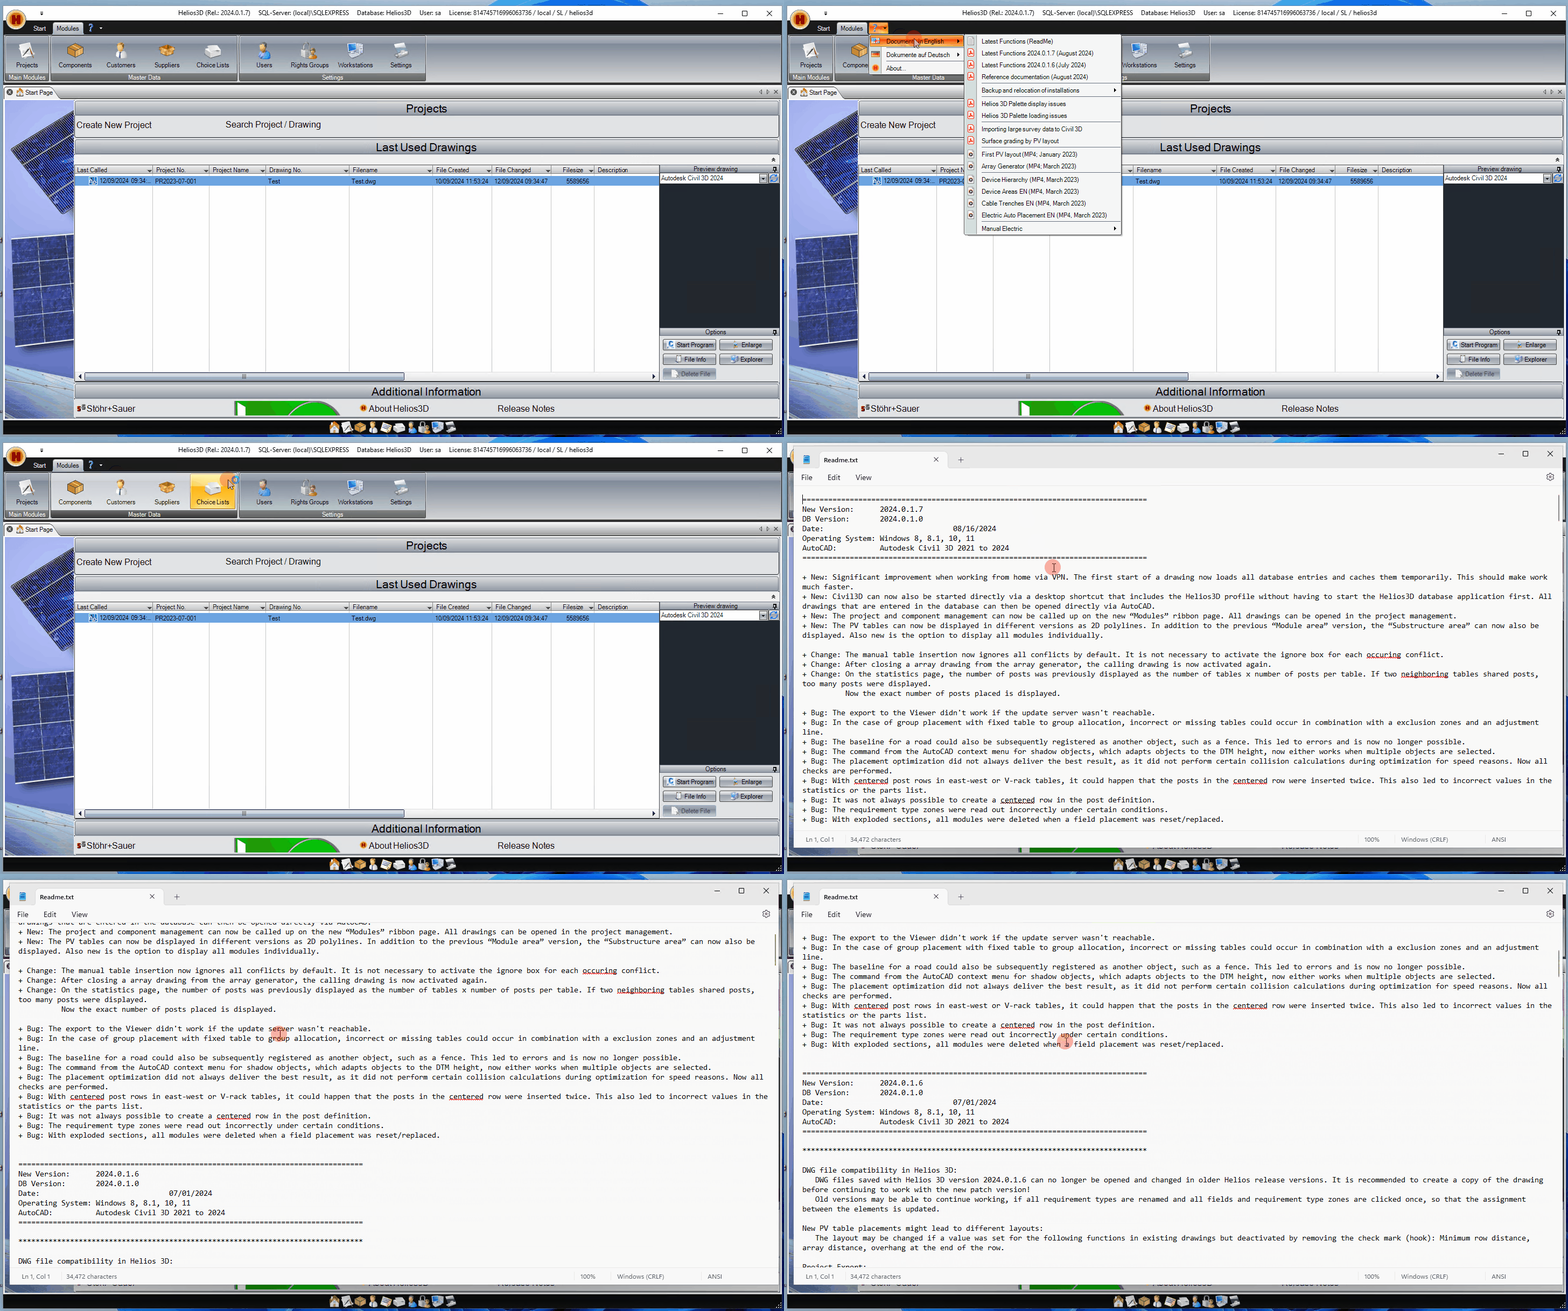
After installing the updates, you have the option to view the new features or changes introduced by the update.
Moving installations
Use this section when a Helios 3D installation must be copied to another workstation or moved to a server-based network installation. The goal of the procedure is to reproduce the existing working environment with the same program version before any additional update is performed.
Do not combine a migration with a version upgrade unless this has been explicitly planned and tested. First create a working copy of the existing environment, verify login, database access, project paths, library paths and licensing, and then perform the update as a separate step.
Moving Helios 3D to a Local Station
This document describes how to move/copy a Helios 3D installation from a station or server to a local workstation. The result will be an exact copy of the same program version.
Please do not attempt to change the Helios 3D program version during this process, such as switching to a newer version simultaneously! You can update the old installation first and then start the move, or update the moved installation after it has been tested.
You will need Microsoft SQL Server Express on the target system, and we recommend using the ‘sa’ account for server login. Additionally, the server collation must be identical at both the source and target systems; otherwise, the database cannot be imported! As long as there are no different country and region settings in Windows, there should be no issues after Step 1.
Before starting the move, collect the following information from the existing installation:
- current Helios 3D program version,
- SQL Server name and database catalog,
- project base path,
- library base path,
- program base path,
- license setup used by the workstation,
- Windows user or SQL user used for database access.
After copying the installation, test the new workstation before the old installation is removed or decommissioned. Open Helios 3D, log in to the copied database and verify that projects, libraries and system settings point to the new locations.
To move the database, you will need SQL Server Management Studio on both the old station (for export) and the target system (for importing the database). It is available for free download from the Microsoft website.
We recommend the following procedure:
- Install Microsoft SQL Server (Express) on the new computer. The program version should be the same or newer than the old one. (Please note the above instructions regarding server collation and authentication.)
- Copy the database. You can create a backup of the current database and restore it on the new station. Both steps require SQL Management Studio on the stations.It is advisable to use the ‘sa’ account for Helios and ensure that ‘sa’ is also set up on the target SQL Server. Please test that the ‘sa’ account can log in and access the Helios 3D system settings. Otherwise, there may be issues with user permissions.Help for moving or copying databases, as well as for determining server collation, can be found on Microsoft’s website.
- Copy the entire Helios 3D installation directory, including the project and library folders (which may be located outside the installation directory).
You can find the current paths for the project directory and the library directory in the Helios 3D system settings.
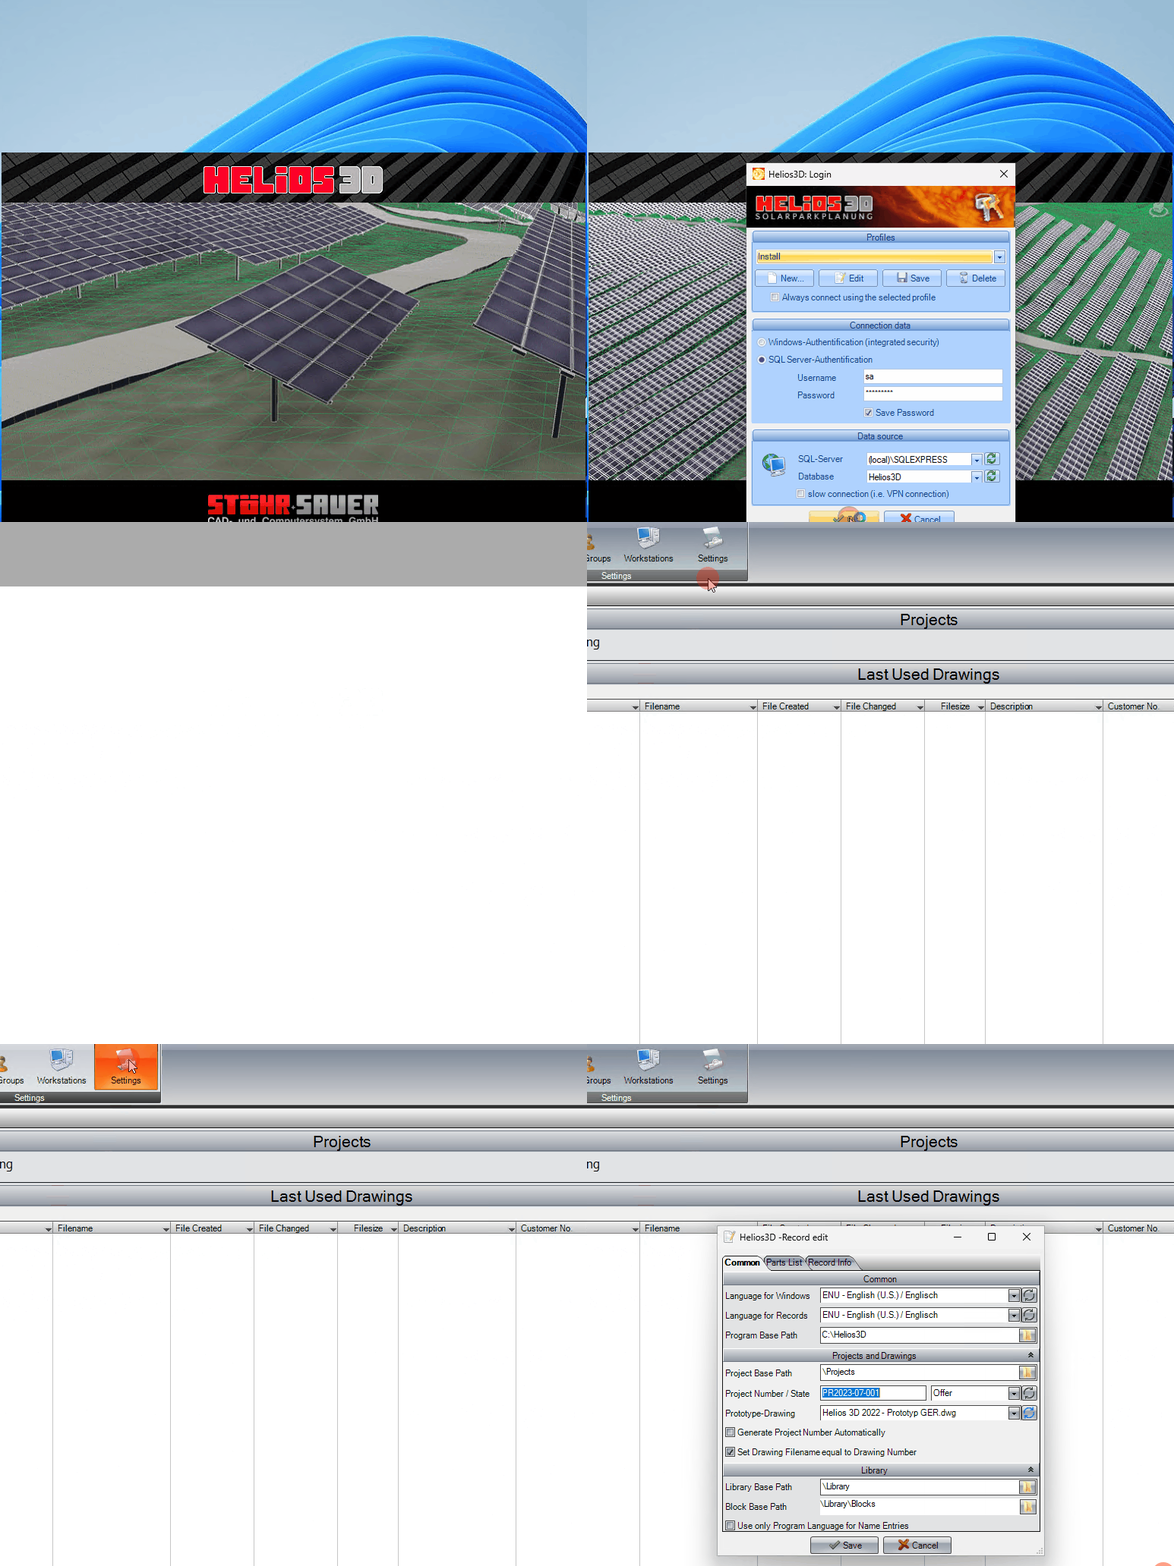
- Copy the files to the new workstation, overwriting existing files and folders.
- To set up the Sentinel driver for license key detection and to create a desktop shortcut, run .\Client Setup\setup.exe from the program folder.
- Start the copied Helios 3D from the new workstation and connect to the new database. Go to the Helios 3D system settings and adjust the paths if necessary (program, project, and library base paths).
If the old system is being decommissioned, we recommend thoroughly testing the new workstation in advance!
Moving Helios 3D to the Network
This document describes the process of moving/copying a Helios 3D installation from a workstation to a server. The result is an exact copy of the same program version as a network installation, allowing multiple clients to connect.
Please do not attempt to change the program version of Helios 3D during this process, such as upgrading to a newer version at the same time! You can either update the old installation first and then begin the move, or update the moved installation after it has been tested.
In any case, you will need a Microsoft SQL Server Express on the target system, with the recommended server login via the ’sa‘ account. Additionally, the server collation at both the source and target must always be identical; otherwise, the database cannot be imported! As long as there are no different country and region settings in Windows, there should be no issues here.
To move the database, you will need SQL Server Management Studio for exporting from the old workstation and importing it on the target system. If all servers have network access enabled, this can be done from a single workstation; otherwise, SQL Server Management Studio must be installed on both. It is available for free download from the Microsoft website.
In the following figure, you can see the basic structure of a network installation with all network communications. Please note:
- A single server can be used for everything.
- The license server is not required for single-user licenses.
- The Projects and Library directories can also be outsourced to another server.
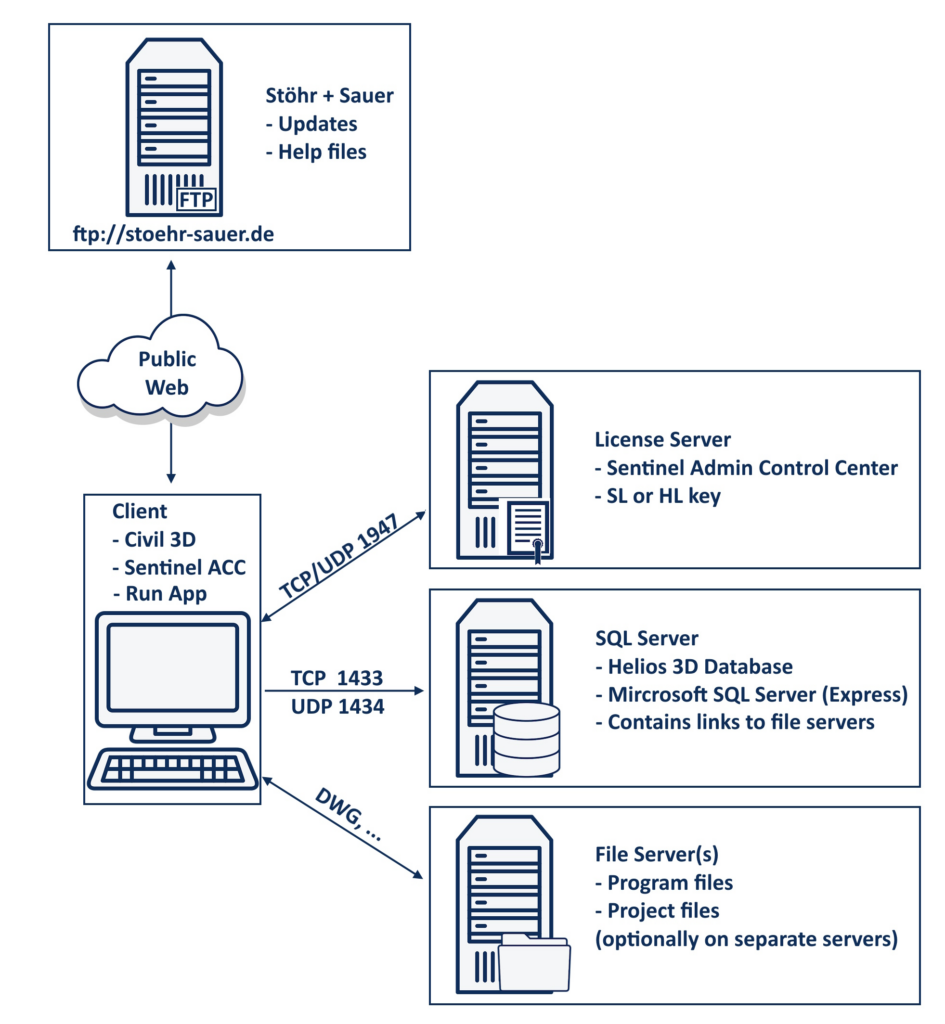
We recommend the following approach:
- Install a Microsoft SQL Server (Express) on the new server. The program version should match the old one or be more recent (please follow the above notes regarding server collation and authentication).
- Copy the database. For this, you can, for example, create a backup of the current database and restore it on the prepared SQL server. Both steps require SQL Management Studio. It is recommended at this point to ensure that the „sa“ account can be used for Helios 3D and that „sa“ is also set up on the target SQL server! Please test that the „sa“ account can log in and access the Helios 3D system settings. Otherwise, there may be issues with user permissions. You can find assistance for moving or copying databases, as well as for determining the server collation, on the Microsoft website.
- Copy the entire Helios 3D installation directory, including the project and library folders (which may be outsourced from the installation directory). You can find the current paths for the project directory and library directory in the Helios 3D system settings.
- Insert the copy on a server drive. All users need write access to the Helios 3D directory.
- Run the setup.exe from the „Client Setup“ folder of the Helios 3D installation. This will register the workstation and, if necessary, install the Sentinel driver for license detection.
- Launch Helios 3D from the first workstation (the desktop link will have been updated by the Client Setup) and log in to the new database. Go to the Helios 3D system settings and adjust the paths accordingly (program, project, and library base paths). These specified paths will then be used by every workstation. For network installations, please ensure that each path is valid for every workstation (e.g., check drive letters).
- Client setup: You can now set up additional clients (workstations) by running the Client Setup. For existing clients, only the shortcut needs to be updated. To do this, run the setup.exe in the „Client Setup“ subdirectory of the program folder. By default, launching Autodesk Civil 3D from the network is disabled. Therefore, you need to edit the Acad.exe.Config file in a client’s installation directory using the Windows Editor. The original is usually located in: „C:\Program Files\Autodesk\AutoCAD Version#“.
You can safely copy the file and manually adjust it or replace it with the file of the same name from the Helios 3D installation directory.
To manually adjust the file, find the first <runtime> section and add the following line in red:
<runtime>
<loadFromRemoteSources enabled=“true“/>
</runtime>

Adjusting old clients after a move:
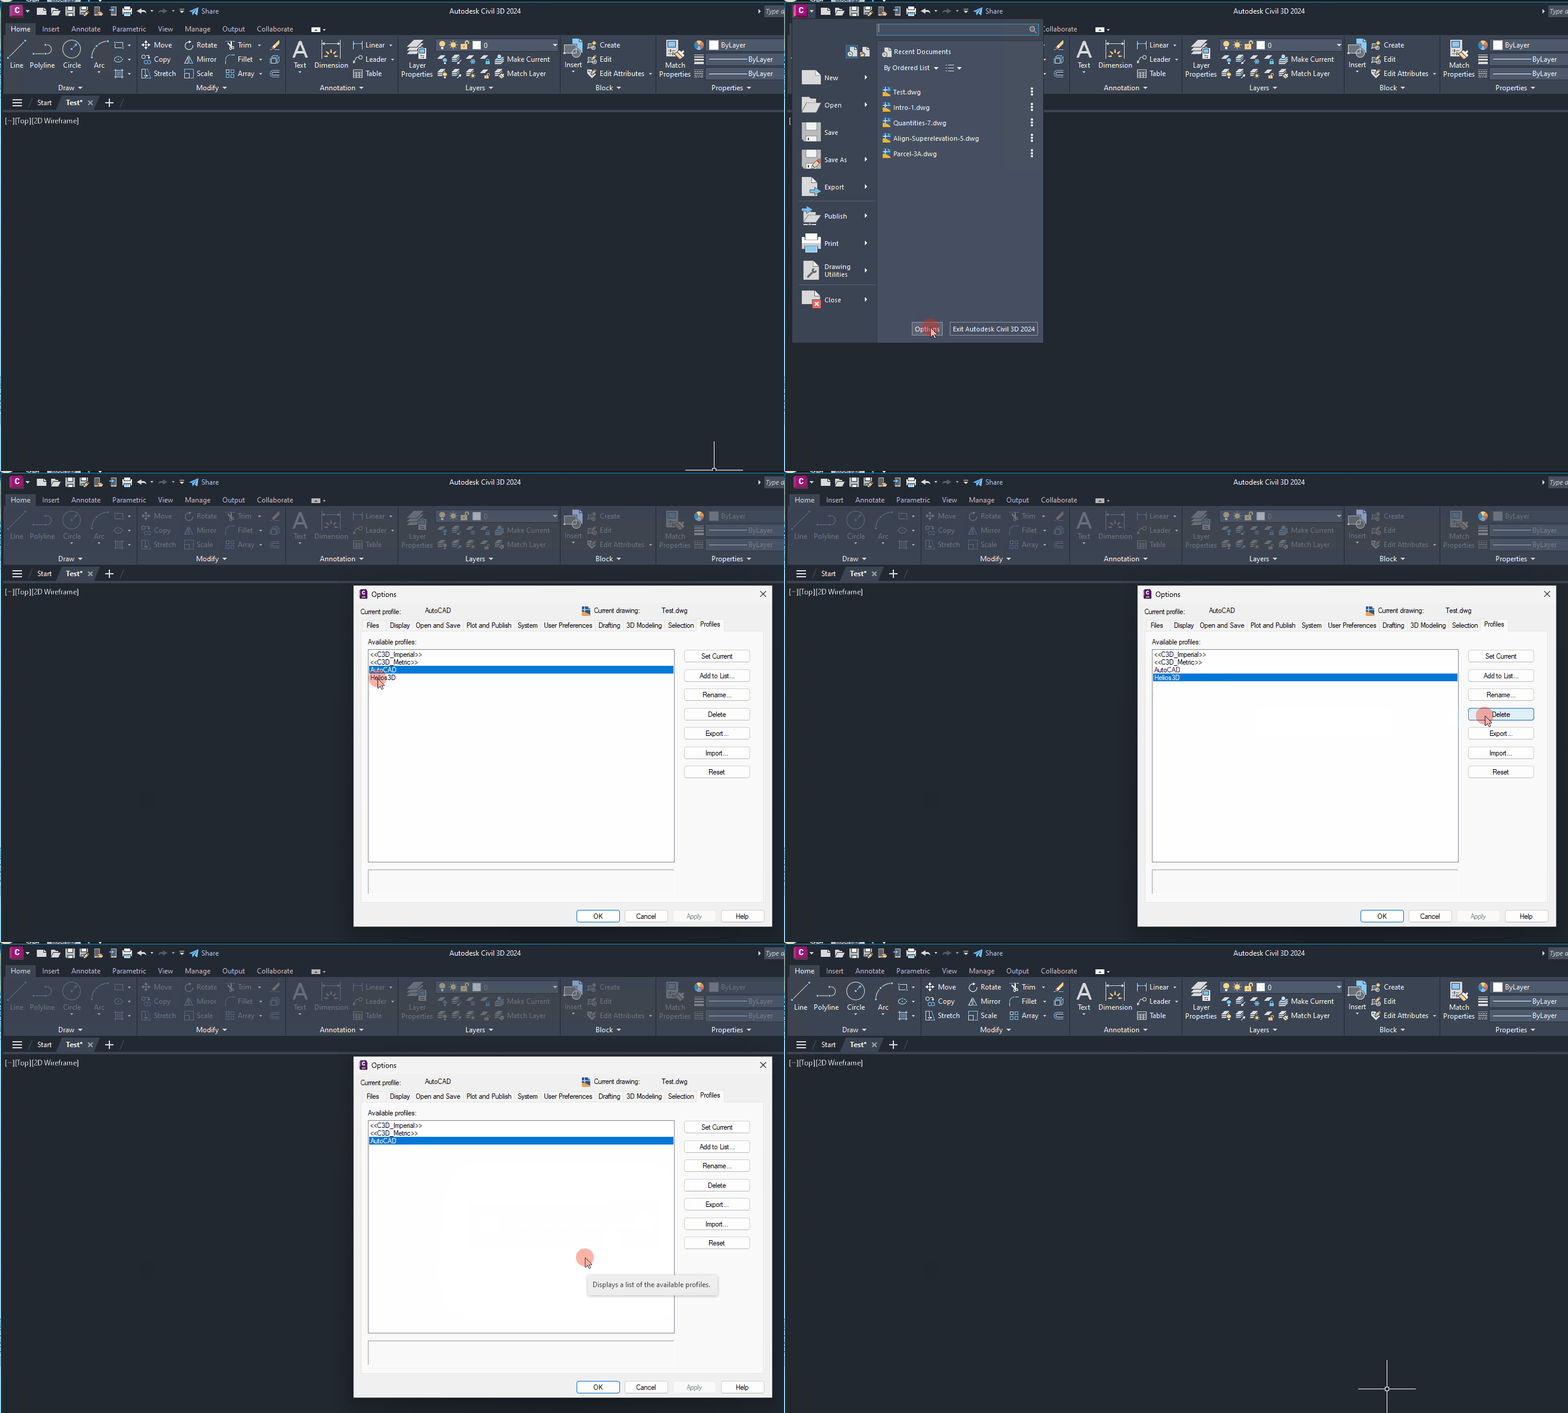
Starting from Helios 3D version 2017, you also need to adjust or replace the Autodesk Civil 3D profile to ensure that the Helios 3D DLLs are not loaded from the old directory. The easiest way is to delete the profile (usually named „Helios3D“) in the Autodesk Civil 3D options. The profile should be automatically recreated by Helios upon the next start of AutodeskCivil 3D. Personal settings in the Autodesk Civil 3D profile will, of course, be lost.
Troubleshooting
The following checks may help if Helios 3D does not start correctly after an update, restore or migration:
- Check whether the Helios 3D program version is compatible with the database version.
- Verify that the SQL Server is reachable and that the selected database catalog is correct.
- Make sure that no workstation is still connected to the database during a restore.
- Check whether the project base path and library base path in the Helios 3D system settings point to the copied or restored directories.
- For network installations, verify that all clients can access the same paths with sufficient permissions.
- If Helios 3D DLLs are still loaded from an old directory, recreate the Autodesk Civil 3D profile used by Helios 3D.
- If the license is not detected after moving the installation, run the Client Setup again and check the Sentinel driver or license server configuration.