
Requirement Type Zones
Requirement type zones consist of polylines that define areas with different conditions (such as surface type, environment, etc.) for the placement of racks. These zones allow you to apply different array definitions or the same array definition with varying parameters, depending on the specific conditions in the zone. For example, you might increase the number of posts to strengthen the stability of a rack in a particular area.
Requirement Type Zones are useful when one field contains areas that require different rack or array configurations. Typical reasons may be different soil conditions, local structural requirements, environmental restrictions, or planning areas where a different rack setup is required. The zone itself defines the geometric area, while the assigned Requirement Type defines which array definition and parameters are used during placement.
To use a requirement type zone, you need to connect it to a corresponding requirement type, so Helios knows which array definition and configuration to apply to that zone. To do this, go to the structure list, select the requirement type zone, and in its properties, choose a requirement type from the list.
Before a Requirement Type Zone can influence the placement result, the corresponding Requirement Type must already exist in the field properties. Check the Arrays tab of the selected field and make sure that the required Requirement Types and their array definitions have been created and configured before starting the placement.
The figure below illustrates the connection structure for the requirement type zone „Sandy Ground,“ where the requirement type „Sandy Terrain“ is selected in its properties. This setup ensures that the correct array definition is applied based on the conditions of the zone.
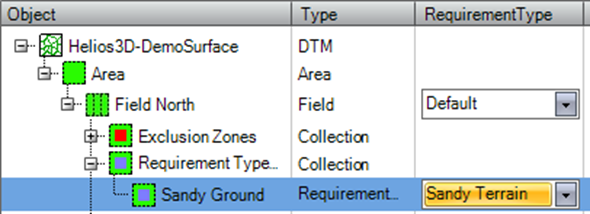
In this example, “Sandy Ground” represents the geometric zone in the drawing, while “Sandy Terrain” represents the Requirement Type that contains the relevant array definition and parameter settings. During placement, Helios 3D evaluates the overlap between the zone and the field and applies the assigned configuration only within the affected area.
Besides the connection structure of the default requirement type, you can also define additional requirement types for specific zones within the field. These additional requirement types can be linked to different array definitions or the same array definition with altered parameters based on the unique conditions of the zone (such as surface type or environmental factors).
This flexibility allows for tailored configurations to address specific needs, like strengthening the structure in certain areas by adjusting parameters like the number of posts. By connecting these additional requirement types to the appropriate requirement type zones, Helios 3D can apply the correct array definitions and configurations for each zone, ensuring optimal placement based on varying conditions throughout the field.
This approach provides a more dynamic and adaptable setup, allowing you to optimize the performance and stability of your rack systems across different environmental conditions.
Array Definition → Default Requirement Type → Field (Properties)
the following connection structure applies to any requirement type zone X of the collection of a field:
Array Definition → Requirement Type → X → Requirement Type Zone → Field
The connection of a requirement type zone to a field is automatically managed by Helios 3D. When a requirement type zone is created, Helios 3D automatically connects it to any field it overlaps with. This means that if the polyline of a requirement type zone intersects or covers part of a field, Helios will assign the corresponding requirement type to that area within the field.
Procedure for a Placement with Requirement Type Zones
Use Requirement Type Zones only for areas where the placement should differ from the default field configuration. If the same array definition and parameters should be used across the complete field, no additional Requirement Type Zone is required.
Here’s a step-by-step guide to connecting and managing requirement types and zones in Helios 3D:
- Select a Field in the „Structure“ List of the „Placement“ Tab:
- Open the “Placement” tab and locate the „Structure“ list.
- Select the field where you want to apply the requirement type zones.
- Go to the “Arrays” Tab in the „Properties“ of the Field:
- In the „Properties“ of the selected field, navigate to the “Arrays” tab.
- Create all necessary requirement types, making sure to add at least one additional requirement type beyond the default.
- Add the Corresponding Array Definitions to Each Requirement Type:
- For each created requirement type, add the appropriate array definitions.
- Set the rack parameters for each array definition as well as for each requirement type. These parameters may include factors such as the number of posts, the spacing, and other configuration details.
- Make sure that the zone polyline overlaps the target field. The connection between a Requirement Type Zone and a field is managed automatically by Helios 3D based on the geometric overlap. If the zone does not intersect the field, it may not be considered during placement.
- Create a Requirement Type Zone:
- Create a requirement type zone by drawing directly on the field or adding a polyline to represent the area where different conditions (such as surface type or terrain) apply.
- This zone will determine where specific array definitions or configurations should be used based on the conditions of the zone.
- Select the Requirement Type Zone in the “Structure” List of the “Placement” Tab:
- In the „Structure“ list of the „Placement“ tab, select the newly created requirement type zone.
- Then, choose the corresponding requirement type from the list.
- Start Placement:
- Once everything is set up, initiate the placement process.
- Helios 3D will automatically apply the selected requirement type and array definition to the areas defined by the requirement type zone, adjusting the placement based on the local conditions within the field.
After placement, review the resulting rack layout in the affected zone. Check whether the intended array definition and parameter changes, such as modified post count or spacing, have been applied only inside the Requirement Type Zone. If the result does not match the expected configuration, verify the assigned Requirement Type, the zone geometry, and the overlap with the field.
By following these steps, you can efficiently manage and customize the placement of racks and arrays in Helios 3D, ensuring that each area of the field is optimized according to its specific conditions.
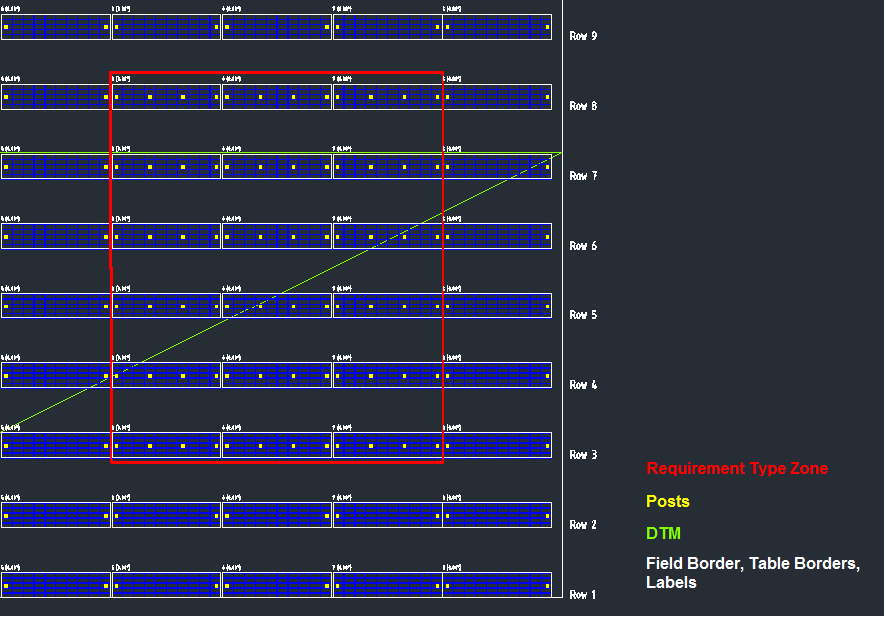
An example result of a placement with a requirement type zone would typically show how the arrays or racks are placed within the field, with specific areas receiving different array definitions or configurations based on the conditions defined by the requirement type zone.
Notes and Troubleshooting
If a Requirement Type Zone does not affect the placement result, check the following points: the zone must overlap the field; the zone must be selected in the Structure list; a valid Requirement Type must be assigned in the properties; the Requirement Type must contain the required array definition; and the placement must be recalculated after changes. Also check whether the default Requirement Type is still being used because no additional Requirement Type was assigned to the zone.